Difference between revisions of "Convoys"
Views
Actions
Namespaces
Variants
Tools
| Line 2: | Line 2: | ||
===Getting Started=== | ===Getting Started=== | ||
<pre> | |||
1. Define a Start Point (SP) and mount order. | 1. Define a Start Point (SP) and mount order. | ||
2. Define convoy reaction contact. | 2. Define convoy reaction contact. | ||
3. Define convoy speed. | 3. Define convoy speed. | ||
4. Define convoy spacing. | 4. Define convoy spacing. | ||
</pre> | |||
Convoys start by defining a mount order. A mount order describes which units are in which vehicles, and it also defines where those units are riding in the convoy. | Convoys start by defining a mount order. A mount order describes which units are in which vehicles, and it also defines where those units are riding in the convoy. | ||
Latest revision as of 05:38, 16 April 2018
The Guide to Convoy Operations
Getting Started
1. Define a Start Point (SP) and mount order.
2. Define convoy reaction contact.
3. Define convoy speed.
4. Define convoy spacing.
Convoys start by defining a mount order. A mount order describes which units are in which vehicles, and it also defines where those units are riding in the convoy.
Generally, larger, more armored vehicles will take the lead in open terrain. That said, armored assets should be kept back in urban terrain environments, only to push up when infantry or other lighter vehicles require support, or when confirmation is given that the anti-armor threat is not present in the direct vicinity.
Convoy order will be posted on map near your spawn location. Vehicles are for the most part spawned at the vehicle spawners so that we can match the number of vehicles to the player count. In most situations the fire team leader drives the vehicle, and the automatic rifleman mans the gun. Once you've spawned your vehicle, and you've started moving, you should keep your eyes on the road the best you can. Spacing is key for convoy ops. Go into the Eden Editor at some point and measure off 25, 50, 75, and 100 meters. See how far that really is and base you spacing on those distances. Mostly, spacing should default to 50 meters. At that distance no IED blast will carry over and kill two vehicles, you'll have enough stopping distance, and there's no risk of you damaging each other's vehicles in a collision.
Rolling Out
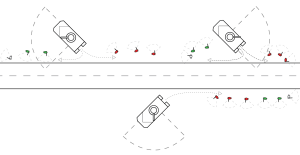
Your gun on your vehicle is a powerful asset most of the time. It turns your assistant automatic rifleman into a heavy machine gunner. Don't abandon this gun upon dismount. Ask to take it with you if you must - try your very best to take it along. This gun is useful in the convoy itself especially. It's a suppressing force that can allow you to roll through contact or take out high level threats (RPG Gunners, technicals, etc). The gun is only useful, though, if you have it pointing mostly in the right direction in the first place. That's where pre-defined fields of fire come in. Coalition SOP for our fields of fire in a convoy should look like this image
Stop on Contact - Roll Through Contact?
The decision to stop or roll through is made by the squad leader, and ultimately by the platoon leader, but sometimes the situation demands quick decision making that determines the game plan for everyone else as well. If the lead vehicles stops, or if it blasts through; well that usually determines how the following vehicles choose to act, too. Be aware of this as a lead vic.
If you are rolling hot (big guns) it might be a better idea to stop and neutralize contact, simply to guarantee the safety of less equipped vehicles that may follow. Considering the people behind you is important when you do anything in a convoy.
Generally, you should only roll through if you think the following vics can make it. Of course it also depends on ROE. Green ROE, you'll generally push right through because you don't want to shoot back. ROE is red and you better bet you're stopping unless the contact is very light and does not pose a threat to you or any one in the company.
Stopping/Dismounting
If a convoy halt is ordered, stop in the middle of the road so it's easy to roll again. If you take contact, or if a dismount is ordered, you should pull off the road in a herringbone formation. A herringbone consists of the lead vic pulling left, the second vic pulling to the right, the third to the left, the fourth to the right, so on and so on. This second image depicts a proper herringbone stop.
Looking at that image, you would probably think that how and where you dismount is determined by what vehicle you're in. This is not the case. Generally, dismounting is simple. Follow these three steps as a fireteam or squad leader, you'll have good solid dismounts every time.
- Create a plan for dismount.
- Questions you should ask yourself before making a plan: Which color teams are covering which sectors of fire? Which side of the road are you moving to? Are you splitting the color teams? What sector of fire is the vehicle covering? How are other teams dismounting?
- When you call dismount, say whether it is a partial or a full dismount. On partial dismount, the gunner and driver remain in the vehicle.
- Move away from the vehicle quickly.
- Get cover as quickly as possible. If no cover is available in the direct vicinity of the vehicle, you should move farther away. Try to maintain even spacing the moment you get out of the vehicle. It's your job to get out of the killzone and into cover before you worry about anything else. Don't get stuck in the street.

