Difference between revisions of "Vehicle/Aircraft Operations"
Views
Actions
Namespaces
Variants
Tools
Jester2138 (talk | contribs) |
Jester2138 (talk | contribs) |
||
| (11 intermediate revisions by 4 users not shown) | |||
| Line 1: | Line 1: | ||
In almost all missions here at Coalition, vehicles will be used in many different capacities. It is important that you understand both ground and air vehicle operations if you plan on using them within sessions. | In almost all missions here at Coalition, vehicles will be used in many different capacities. It is important that you understand both ground and air vehicle operations if you plan on using them within sessions. | ||
NOTE: the vehicle spawner also serves as a rearm/refuel/repair pad automatically for any vehicle on it. | |||
== Ground Vehicles == | == Ground Vehicles == | ||
| Line 17: | Line 19: | ||
[[AFV_Operation]] | [[AFV_Operation]] | ||
[https://youtu.be/2Wf5EQpGTtU Tutorial by Jester on tank operations.] It goes over tactics and strategy at both an individual level and at the company level. If you are interested in operating armored vehicles in ARMA with Coalition, you should watch this. | |||
== JTAC-Aircraft Operations == | == JTAC-Aircraft Operations == | ||
[https://www.coalitiongroup.net/wiki/index.php/JTAC-Aircraft_CAS_procedures Has it's own page here.] | |||
== Flying Aircraft Effectively == | == Flying Aircraft Effectively == | ||
| Line 143: | Line 67: | ||
*A good way to navigate in helicopters equipped with the necessary equipment is to draw a course line on the map and open a NAV display panel in your HUD so you can easily follow the line and navigate without hitting M constantly. | *A good way to navigate in helicopters equipped with the necessary equipment is to draw a course line on the map and open a NAV display panel in your HUD so you can easily follow the line and navigate without hitting M constantly. | ||
*[[Air Assault for Pilots]] - Jester's guide on multi-craft based operations in tandem. | |||
====Attack Helicopters==== | ====Attack Helicopters==== | ||
Latest revision as of 05:21, 19 March 2020
In almost all missions here at Coalition, vehicles will be used in many different capacities. It is important that you understand both ground and air vehicle operations if you plan on using them within sessions.
NOTE: the vehicle spawner also serves as a rearm/refuel/repair pad automatically for any vehicle on it.
Ground Vehicles
Ground vehicles can range from an ATV to an M1A2 Abrams main battle tank during sessions.
Transport
Transport vehicles range from anything between light cars to heavy transport trucks. They are vehicles with very little to no combat effectiveness that are used to transport troops or supplies.
Transport vehicles are used to get from point A to point B. While most vehicles we use will be armed, you should not rely on them to provide as a frontline combat unit. With little to no armour and no crew protection, they make for easy targets. Instead you should try to use them as a base of fire, or to partially dismount and advance with the infantry.
Combat Capable
These are armoured personnel carriers, infantry fighting vehicles and main battle tanks. Refer to vehicle identification for a detailed list of such vehicles. APCs and IFVs are capable of transporting troops into the battlefield with added protection.
Your role when you are crewing a combat capable vehicle is to support the infantry. The infantry will keep anti-tank crews away from you, while you support their advance and knock out any armor they encounter. You should never lead a push into a city or through hedgerows without infantry support. You have a mutually beneficial relationship with the infantry so use it to your advantage against enemy forces.
AFVs/IFVs
Tutorial by Jester on tank operations. It goes over tactics and strategy at both an individual level and at the company level. If you are interested in operating armored vehicles in ARMA with Coalition, you should watch this.
JTAC-Aircraft Operations
Flying Aircraft Effectively
Notes Common to Helicopters and Fixed-Wing
- Object view distances (VERY IMPORTANT): For transport, sufficient to see the LZ early enough to make a good approach (e.g. 2-3km). For attack, greater than your longest-range weapon (e.g. 4-6km). A tip: set your Arma vanilla object view distance settings to the max, then limit with ACE settings (found in top left of ESC screen) to your preference. Otherwise, if you set your vanilla object distance to e.g. 2km and go to ACE and increase view distance to 6km, you still won't see objects past 2km.
- Key bindings: everyone has different preferred keybindings, but here are some important default bindings:
- "Next Target" = R = useful for targeting a vehicle/aircraft/laser that you can see but aren't pointing directly at
- "Lock Target" = T = lock the vehicle/aircraft/laser you are pointing directly at (also ranges your gun in some RHS vehicles that require manual ranging of the gun)
- "Switch Weapon" = F = switch weapon
- "Radar on/off" = Control + R = turn your radar on and off
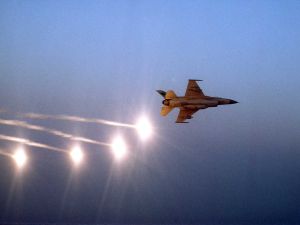
- "Release Countermeasures = C = drops both chaff and flares to confuse radar and IR seekers
- It's highly recommended to create keybindings for the left/right display panel functions so you don't need to use the scroll menu. A useful combination is NAV on one side and SENSOR on the other.
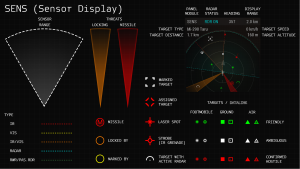
- Radar: All aircraft have a radar-warning receiver which will show radar emitters as a yellow circle on the SENSOR display panel in your HUD. It's important to pay attention to these because they are likely to be an anti-air threat. Some aircraft have radars themselves, which they can use to find other aircraft beyond visual range or fire radar-guided missiles like AIM-120s. However, turning your radar on makes you instantly visible to anyone with a radar-warning receiver, so you need to strategize your use of it (Arma's AI, however, is not coded to look for radar emitters; this may change). Make sure you understand most of the symbology in the SENSOR panel, as it will keep you alive:
- Evading missiles: The trick to avoiding missiles is three-fold: 1) release countermeasures early 2) change your velocity relative to the missile as much as possible and 3) never get shot at from short-range. Missiles don't turn well, so if you confuse them with countermeasures and require them to turn you have a good chance of evading them. If you're within 1.5km and moving slowly not only will your countermeasures not attain sufficient spread but the missile probably doesn't have to turn much to hit you. So don't risk getting that close to a target unless you know there are no AA missile threats.
- Radios: You'll likely be equipped with 3 radios: a 343 (short range, talk to crew outside the aircraft), a 152 (platoon net, if no JTAC you'll use this to talk to PL), and a 148 (air net, talk JTAC and your fellow pilots). The vast majority of your time will be spent talking to PL/JTAC so make sure you can access that radio easily. It's highly recommended to set the 152 and 148 to different ears so you know who's talking to you quickly.
- Hardware: A flight stick and head tracker are both highly recommended, but not necessary. The head tracker is probably the more useful accessory to get, especially for helicopters, as it gives you much greater situational awareness which is especially important when taking off and landing in confined areas.
Flying Helicopters Effectively
Helicopters are a complex and powerful tool for the Platoon. Platoon leaders need to understand their capabilities in order to make effective use of them. Pilots need to know how to properly fly the airframe in question in order to provide those capabilities. Don't take pilot/crew slots unless you know how to use those aircraft and their weapons.
Let's consider the many different types of helicopters and the different strategic and piloting considerations relevant to them.
Transport Helicopters
- Principle function is to move infantry across the battlefield rapidly and safely. Great care must be taken to remain low (so as to avoid radar and IR AA systems), fast (so as to avoid small-arms fire), and precise (so as to avoid spending more time in danger than necessary). Pilots must be able to approach an LZ directly without overflying it or gaining altitude right before landing, as either situation can quickly become disastrous if there are enemy in the area.
- As a pilot, you are responsible for the safety of the aircraft and its passengers first and foremost. It's not Platoon's job to make sure you don't crash, so don't be a hero and agree to fly into a bad LZ or one beyond your piloting capabilities. You should suggest an alternative LZ.
- A good way to navigate in helicopters equipped with the necessary equipment is to draw a course line on the map and open a NAV display panel in your HUD so you can easily follow the line and navigate without hitting M constantly.
- Air Assault for Pilots - Jester's guide on multi-craft based operations in tandem.
Attack Helicopters
- Attack helicopters require a completely different set of considerations than transport helicopters and are much more challenging to use well. The attack helicopter must be close enough to see the enemy while remaining far enough away to not get shot down. This requires a very careful balancing act by the pilot and great situational awareness of the local friendly and enemy forces and their makeup.
- Attack helicopters must always prioritize their tasks:
- First, don't get shot down, because if you are then you can't help the ground pounders. You must live in constant fear of anti-air threats in order to be a good attack pilot. There are three main types of threats and they must be approached differently:
- Anti-Aircraft Artillery (AAA or triple-A): These can be tracked vehicles, like the Russian ZSU series, or just huge machine guns mounted to a truck or emplacement, like the Russian ZU series. A ZSU often is coupled to a radar and uses it for finding you and ranging its air-burst munitions or for targeting its missiles. Any radar emitter will show up as a yellow circle on your SENSOR display panel so make sure you keep an eye on it. A good rule of thumb is to not get closer than 3km to a radar-equipped AA threat unless you are actively attempting to kill it or can use terrain masking, and even then you need to be very careful.
- MANPADS: These are Man Portable Air-Defense Systems - usually shoulder-fired missiles like Stingers. They are possibly the most dangerous threat to helicopters because they are very difficult to find and can hit you with little warning. They don't emit radar or significant IR signatures so the only way to find them is to see them optically. Generally, pilots should always assume an enemy force has MANPADS and never get closer than 1.5km to known enemy forces until they are sure it's safe to do so.
- Other Aircraft: If you're in most helicopters, the only thing you can do is not be seen in the first place. If you spot enemy aircraft, stay low, move away, hide behind terrain, and keep your radar off. Some gunships carry anti-air missiles, and can fight back. For proper use of anti-air missiles see the section on fixed-wing combat.
- Second, kill the enemy.
- How to use your missiles:
- Hellfires will only successfully track a lock/laser if the helicopter is pointed almost directly at the target at the time of firing. The crew must communicate so that the gunner waits for the pilot to line the aircraft up before firing. Don't waste missiles firing before the pilot's ready!
- AGM-114K Hellfire II: Laser-guided anti-tank guided missile. Turn on laser, switch back to AGM-114K, press T to lock onto the laser, wait for lock, fire, hold laser on target until impact.
- AGM-114L Hellfire II: Heat-seeking anti-tank guided missile. Look at target, press T, wait for lock, fire missile.
- AGM-114N Hellfire II: Laser-guided thermobaric missile. Same operation as K-model, but used against infantry and buildings.
- 9M120M & 9M121M: radio-command guided anti-tank missiles. Look at target, fire, hold cross-hair on target until impact. The 121M IRL is a laser-guided missile but in Arma it functions identically to the 120M.
- How to use your guns:
- Apache/Cobra: To range your gun automatically, turn on your laser, switch back to gun, press T. You'll see a green box around your cross-hair indicating the gun is ranging to the laser automatically. It won't range off water/sky for obvious reasons, so hitting boats and other aircraft this way can be tricky. NOTE: The Apache has a very powerful 30mm that can disable light armor like BMPs. Strategize your weapon usage to delay rearming as much as possible.
- Mi24, Mi28, Ka50/52: you must manually range the gun to each target before firing. Look at target, press T, fire. Repeat for each target. NOTE: Some Mi24s do not have a turret-mounted gun. All Mi28s do. The Ka50/52 has a very powerful gun with very limited traversability.
- How to use your rockets:
- Point and shoot! Try not to use them all at once. They are very powerful, so spread them out for maximum effect. Don't put a bunch of rockets into the same spot.
- How to use your missiles:
- Example scenarios:
- If working in a permissible airspace, meaning no threats of enemy aircraft or radar-guided AA missiles (e.g. Afghanistan, Iraq), the biggest threat is enemy direct fire weapons. In that case, staying high and fast is your friend. Fly a pattern over friendly terrain at an altitude of 600-1000m, approximately 1.5 km behind the front line. Go closer only as needed for specific attacks, and return as soon as possible. If you get a radar/missile warning, dump flares, turn perpendicular to the threat, lose altitude, and gain speed immediately. Then proceed to find/kill the threat as if you were in a non-permissible airspace (see below).
- If working in a non-permissible airspace, meaning there are threats of enemy aircraft or radar-guided AA missiles (e.g. Desert Storm, U.S. vs. RU war, etc.), stay low and hidden over friendly territory as you slowly work around the terrain to find/kill AAA threats. Maximum altitude might be 100m until you KNOW where the threat is and then can work up a suitable plan to kill it. Only once you're sure all such threats are gone might you want to use higher altitudes.
- Example scenarios:
- Two common mistakes Arma attack pilots make are hovering near the AO and/or overflying the enemy when not absolutely necessary. Hovering in a combat zone makes you a sitting duck. Your gunner does not need a stable platform more than you both need to not get shot down. Overflying the enemy is also dangerous and should only be done when your aircraft doesn't have the ability to fire off-center. Aircraft that can fire off-center, like the Apache, should never overfly the enemy or come anywhere close to them. This is why knowing where the enemy is or might be is so important: you need to keep yourself moving within weapons range but not so close you might get shot down.
Flying Fixed-Wing Effectively (TBA)
I definitely need to expand this more.
The RHS CAS jets have systems that don't follow Arma conventions:
A-10A: https://www.youtube.com/watch?v=M_4xBWO5WOE
SU-25: https://www.youtube.com/watch?v=MrION09pv8E
Flying VTOL: https://www.youtube.com/watch?v=DkLWjC0C93o&feature=youtu.be


