Difference between revisions of "Installing our modpack"
Views
Actions
Namespaces
Variants
Tools
(→Preset links: Added a direct #repo channel link) |
|||
| Line 4: | Line 4: | ||
The required mod preset includes all the mods you need to play with us, However we do also allow a few optional effects related mods that change sounds and visual effects. These are optional so as not to impact performance on less powerful PCs. You only need to use the preset link for the mods you intend to use! | The required mod preset includes all the mods you need to play with us, However we do also allow a few optional effects related mods that change sounds and visual effects. These are optional so as not to impact performance on less powerful PCs. You only need to use the preset link for the mods you intend to use! | ||
= Importing a preset = | |||
: | :*Download the preset from above | ||
: | :*Open the ARMA 3 launcher, and click the "mods" tab | ||
[[file:vanillalncher.png|500px]] | [[file:vanillalncher.png|500px]] | ||
: | :*Click the "Presets" dropdown on the top right | ||
[[file:vanillalncher1.png|500px]] | [[file:vanillalncher1.png|500px]] | ||
: | :*You should now see the "Import" button at the bottom of this dropdown. Click it. | ||
[[file:vanillalncher2.png|500px]] | [[file:vanillalncher2.png|500px]] | ||
: | :*This will open a file explorer window. In this window find the HTML in your downloads folder and select it as the file you would like to import. Then click open. | ||
[[file:vanillalncher3.png|500px]] | [[file:vanillalncher3.png|500px]] | ||
| Line 24: | Line 24: | ||
Once the mods are all downloaded you are good to play! You also have a preset that will allow you to easily swap between modpacks with the click of a button! | Once the mods are all downloaded you are good to play! You also have a preset that will allow you to easily swap between modpacks with the click of a button! | ||
= Important Notes = | |||
== For everyone == | |||
Occasionally we have our own fixes or variations of mod files that we use. If you try to launch the game and it warns about missing mod dependencies the first time you run the pack, you should typically '''''IGNORE''''' this warning message and '''''NOT RUN''''' the dependencies. Doing so may result in conflicting mods. | Occasionally we have our own fixes or variations of mod files that we use. If you try to launch the game and it warns about missing mod dependencies the first time you run the pack, you should typically '''''IGNORE''''' this warning message and '''''NOT RUN''''' the dependencies. Doing so may result in conflicting mods. | ||
| Line 32: | Line 32: | ||
Any time the modpack has additions or removals you will need to come here to this page for the updated HTML. You simply repeat the same process but click the "overwrite" prompt when it appears. | Any time the modpack has additions or removals you will need to come here to this page for the updated HTML. You simply repeat the same process but click the "overwrite" prompt when it appears. | ||
== For Mission Designers == | |||
You must use only the required mods when creating a mission. This is because any mod running while in the creation process will add a dependency to the mission file which the server will check against its own mod line. Since optional mods only run locally and not server side, this will break the mission when the server looks at the mod dependencies and doesn't know what to do with its hands. As a result Mission Designers should setup both presets if they intend to run the optional mods during session and pay close attention to which mods they run when creating missions to save themselves and the QA team time and a headache. | You must use only the required mods when creating a mission. This is because any mod running while in the creation process will add a dependency to the mission file which the server will check against its own mod line. Since optional mods only run locally and not server side, this will break the mission when the server looks at the mod dependencies and doesn't know what to do with its hands. As a result Mission Designers should setup both presets if they intend to run the optional mods during session and pay close attention to which mods they run when creating missions to save themselves and the QA team time and a headache. | ||
Fret not it is a simple fix if you do make the mistake. However, you have been warned! | Fret not it is a simple fix if you do make the mistake. However, you have been warned! | ||
Latest revision as of 18:08, 9 March 2022
Preset links
Grab the HTML repo files from the #repo channel in discord.
The required mod preset includes all the mods you need to play with us, However we do also allow a few optional effects related mods that change sounds and visual effects. These are optional so as not to impact performance on less powerful PCs. You only need to use the preset link for the mods you intend to use!
Importing a preset
- Download the preset from above
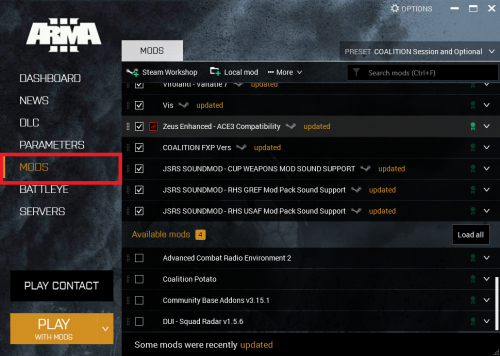
- Open the ARMA 3 launcher, and click the "mods" tab
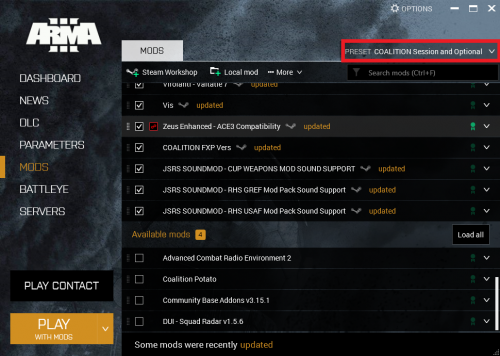
- Click the "Presets" dropdown on the top right
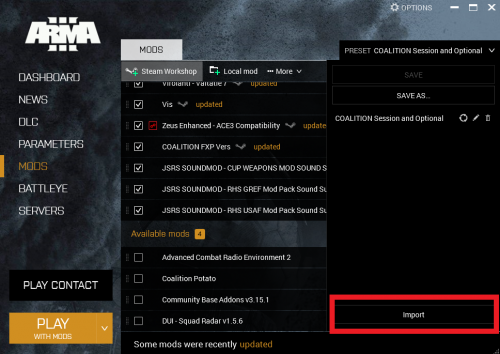
- You should now see the "Import" button at the bottom of this dropdown. Click it.
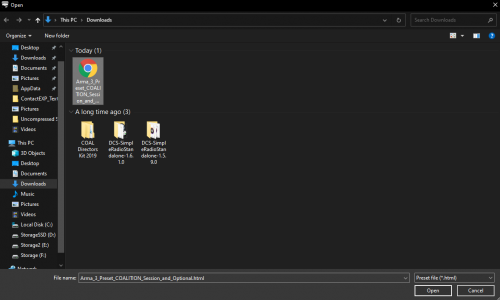
- This will open a file explorer window. In this window find the HTML in your downloads folder and select it as the file you would like to import. Then click open.
This should prompt a new window to appear that verifies you would like to download these mods. Click "subscribe to all". This should start the mods downloading as well as place any mods you might already have installed into the launch preset!
Once the mods are all downloaded you are good to play! You also have a preset that will allow you to easily swap between modpacks with the click of a button!
Important Notes
For everyone
Occasionally we have our own fixes or variations of mod files that we use. If you try to launch the game and it warns about missing mod dependencies the first time you run the pack, you should typically IGNORE this warning message and NOT RUN the dependencies. Doing so may result in conflicting mods.
Any time the modpack has additions or removals you will need to come here to this page for the updated HTML. You simply repeat the same process but click the "overwrite" prompt when it appears.
For Mission Designers
You must use only the required mods when creating a mission. This is because any mod running while in the creation process will add a dependency to the mission file which the server will check against its own mod line. Since optional mods only run locally and not server side, this will break the mission when the server looks at the mod dependencies and doesn't know what to do with its hands. As a result Mission Designers should setup both presets if they intend to run the optional mods during session and pay close attention to which mods they run when creating missions to save themselves and the QA team time and a headache.
Fret not it is a simple fix if you do make the mistake. However, you have been warned!


