Difference between revisions of "Mortar Team"
From COALITION Wiki
Views
Actions
Namespaces
Variants
Tools
m (fixed tiny video) |
|||
| (8 intermediate revisions by 4 users not shown) | |||
| Line 26: | Line 26: | ||
*Relaying communications to and from PL and JTAC/FO | *Relaying communications to and from PL and JTAC/FO | ||
*Giving the firing solution to the Gunner | *Giving the firing solution to the Gunner | ||
**Use map tools and range table to find elevation, azimuth, charge for each fire mission and quickly relay them to the gunner | |||
*Giving the shell type and charge of the shell for the Loader | *Giving the shell type and charge of the shell for the Loader | ||
*You should be calling "round(s) out", "Inbound, ETA __ ", and any other useful information to keep your friendlies safe and informed | *You should be calling "round(s) out", "Inbound, ETA __ ", and any other useful information to keep your friendlies safe and informed | ||
| Line 32: | Line 33: | ||
The Gunner is responsible for: | The Gunner is responsible for: | ||
*Aiming and firing the weapon | *Aiming and firing the weapon | ||
*Ensuring the distancing and azimuth that the TL gives is accurate. You should be double checking the lead's calculations and call-outs to | *Ensuring the distancing and azimuth that the TL gives is accurate. You should be double checking the lead's calculations and call-outs to ensure the round will impact where needed | ||
*Stay on the gun. No reason for you to not be on and ready to put in new coordinates | *Stay on the gun. No reason for you to not be on and ready to put in new coordinates | ||
*Keep the map up when possible. Sooner you see the mark placed on the map, the sooner you will be able to put ordinance on target | *Keep the map up when possible. Sooner you see the mark placed on the map, the sooner you will be able to put ordinance on target | ||
====Loader==== | ====Loader==== | ||
| Line 54: | Line 55: | ||
#Gunner adjusts, and Loader loads another round. | #Gunner adjusts, and Loader loads another round. | ||
#Gunner then fires again if instructed. | #Gunner then fires again if instructed. | ||
===Usage Video Guides=== | |||
{{#ev:youtube|https://youtu.be/6vwY8ioRSq4|1000|center|Mk6 Video Guide}} | |||
{{#ev:youtube|https://youtu.be/Tn9WVqYHCMk|1000|center|VZ99 Video Guide}} | |||
==Final Notes and Tips== | ==Final Notes and Tips== | ||
| Line 59: | Line 65: | ||
[[File:Mortar Map.jpg|none|1000px]] | [[File:Mortar Map.jpg|none|1000px]] | ||
*You will notice he places "AZ" for azimuth and "ELEV" for the elevation for the gun. Doing this will dramatically improve your time to target and fire | *You will notice he places "AZ" for azimuth and "ELEV" for the elevation for the gun. Doing this will dramatically improve your time to target and fire | ||
*Know how to use map tools. If you don't know, see this [[Link title]] | *Know how to use map tools. If you don't know, see this [[Link title]] | ||
Range table for the WWII-era M2 mortar (useful to have on 2nd monitor): | |||
[[File:M2 mortar table.png|none|1000px]] | |||
Latest revision as of 02:23, 31 August 2022
Purpose
Mortar teams are high skill, high value assets place into battle situations to help remove dug in enemies or provide cover and support for friendly troops.
As a mortar team, you will be responsible for:
- Delivering High Explosive (HE) rounds to both close and distance target locations.
- Delivering Smoke rounds to allow friendlies to move either to or from a location.
- Delivering Illumination rounds during night time operations to give friendlies better visual advantage.
- Being ready to move and relocate should the need arise.
Equipment
- 82mm Range Tables (Shows distances adjustments and time of flight to target)
- Map tools (Gives accurate distance estimates on a map. Each number is 1000m on the edge of the tool)
- Watch (Default ArmA tool. Important to keep it open)
Operation
It is common to have a JTAC or Forward Observer working alongside the mortar team to call in support. They will be handling your call-ins and providing info. about splashdown and accuracy of your rounds.
Individual Roles
A mortar team can consist of a Team Lead, Gunner, and a Loader.
Team Lead
The Team Lead is responsible for:
- Relaying communications to and from PL and JTAC/FO
- Giving the firing solution to the Gunner
- Use map tools and range table to find elevation, azimuth, charge for each fire mission and quickly relay them to the gunner
- Giving the shell type and charge of the shell for the Loader
- You should be calling "round(s) out", "Inbound, ETA __ ", and any other useful information to keep your friendlies safe and informed
Gunner
The Gunner is responsible for:
- Aiming and firing the weapon
- Ensuring the distancing and azimuth that the TL gives is accurate. You should be double checking the lead's calculations and call-outs to ensure the round will impact where needed
- Stay on the gun. No reason for you to not be on and ready to put in new coordinates
- Keep the map up when possible. Sooner you see the mark placed on the map, the sooner you will be able to put ordinance on target
Loader
The Loader is responsible for:
- Selecting the right shell and keeping the mortar loading and prepared to fire at any moment
- Setting the charge of the shell and keeping the Lead up-to-date on shells remaining
- Security. If you aren't loading you should be keeping an eye out for possible flanks. This won't happen often but certain missions may have you in close danger
- Help the Gunner with his targeting. Remember what the TL tells him to ensure he can set it accurately
Battle SOP
- Command/JTAC/FO will mark a target and instruct the Team Lead over radio which round (he, smoke, illumination) to use
- The Team Lead and Gunner use the map tools to range the target
- The Loader loads the proper round while the Gunner is setting his weapon. You should call "Loading" and "Loaded" to alert you Gunner
- The Gunner adjusts the mortar to the correct direction & ELEV (range keys: default Page UP and Page down, hold SHIFT to change the range slowly)
- The Gunner will call "Gun Ready" or something similar to alert TL of the status of the gun.
- The Team Lead will call "Fire 1", "Fire 2", ect. to keep track of the number of rounds delivered. He relays the flight time to Command and calls “splash” when the mortar should hit.
- Command/JTAC/FO will call for adjustment to ELEV or direction.
- Gunner adjusts, and Loader loads another round.
- Gunner then fires again if instructed.
Usage Video Guides
Final Notes and Tips
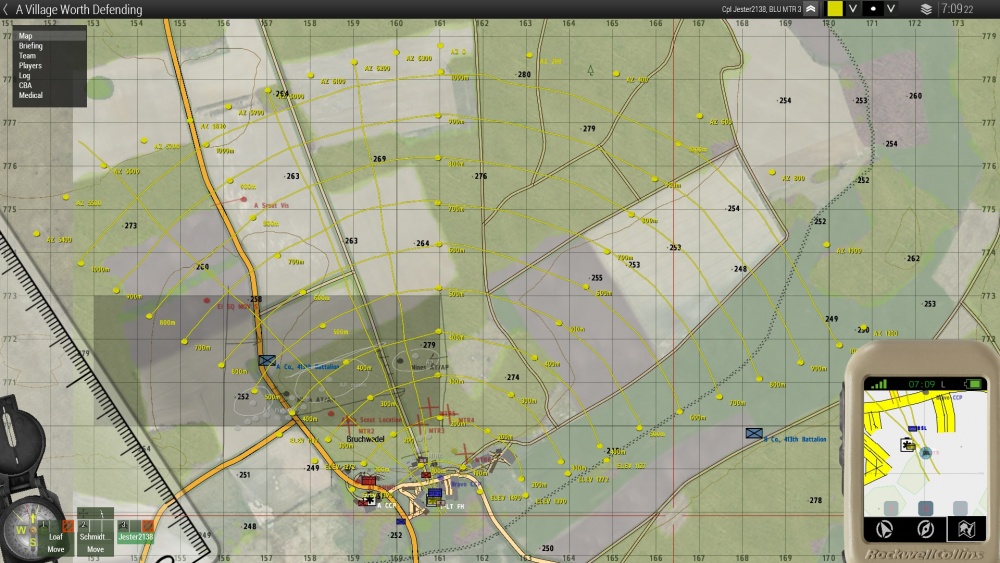
- While you have down time you should begin to set your map to look similar to the picture below. Be sure to do it in Group Chat so you don't clutter the map for others. (Image from @Jester2138 [29.Dec.2017])
- You will notice he places "AZ" for azimuth and "ELEV" for the elevation for the gun. Doing this will dramatically improve your time to target and fire
- Know how to use map tools. If you don't know, see this Link title
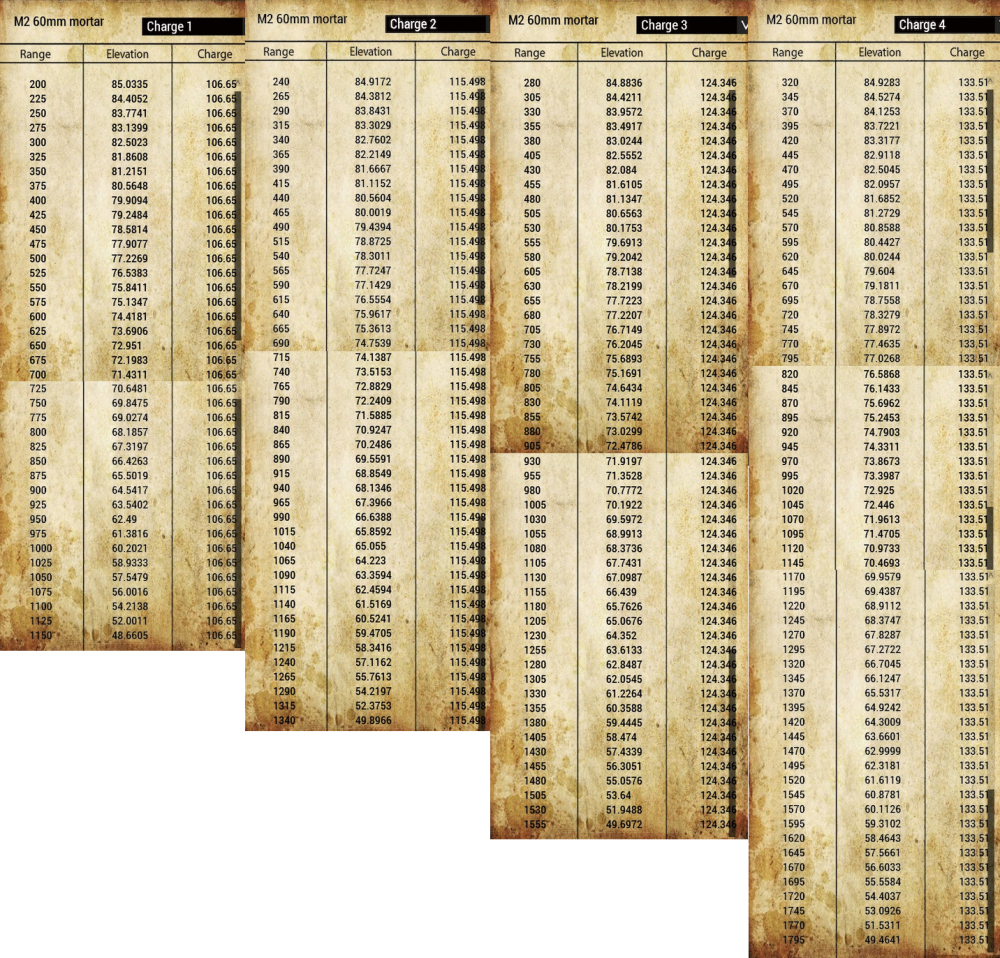
Range table for the WWII-era M2 mortar (useful to have on 2nd monitor):

