Difference between revisions of "Communication and Marking"
Views
Actions
Namespaces
Variants
Tools
m (→General Terms: Added PID) |
|||
| (31 intermediate revisions by 5 users not shown) | |||
| Line 2: | Line 2: | ||
== Radio Communication == | == Radio Communication == | ||
Through | Through the in-game radio system built directly into Reforger, we are able to have multiple people with different radios to talk on the same channel at the same time. This means we have to practice certain protocols to ensure information flows up and down the chain of command properly. By default the '''Caps Lock''' key allows you to transmit over the radio. Below is an image of the message that will appear on the right of your screen when you are transmitting over the radio. | ||
[[File: | [[File:Transmitting.jpg]] | ||
[[File:Radio Wheel.png|thumb|281x281px]] | |||
In addition to letting you know that you are transmitting this message also display some useful information. It shows which frequency you are broadcasting on (in this case 38 MHz). This is important to note so you are transmitting on the correct channel using the correct radio. Before the mission starts it is worth checking your gear to see which radios you have. If you have to change the radio/channel you are broadcasting on, you can open and close the radio wheel by using the hotkey '''G'''. To the right is an image of the radio wheel with 2 channels being available, in this example you can see that the two available channels are CH1 - 38MHz which is Atlas Red 1(This is the name of the group and therefore changes depending on what the group is called) and CH2 - 48MHz which is Platoon channel. | |||
=== Radios & Radio Channels === | === Radios & Radio Channels === | ||
All radio nets are listed | All radio nets are listed in the Group Menu. All sections have their own private frequency whilst inter-section communication is handled on the platoon-wide channel accessible by all section leads and the platoon commander. | ||
'''Short-Range AN/PRC-343:''' | '''Short-Range AN/PRC-343:''' | ||
The AN/PRC-343 or 343 is most basic radio we use. It is mostly used for communication between Fireteam leaders. Almost every position uses a 343 to communicate and it is an important radio to become familiar with. The 343 has the shortest range of all the radios we use so it is important to remember it can only be used to contact nearby elements. The 343 comes equipped with a 2.5in antenna, a max output of 50mW and a range of up to 500 metres in rural terrain. The 343 operates on an Ultra High Frequency. This means they cannot transmit or receive messages from a 152 or 148. Below is an image of the 343 | The AN/PRC-343 or 343 is most basic radio we use. It is mostly used for communication between Fireteam leaders. Almost every position uses a 343 to communicate and it is an important radio to become familiar with. The 343 has the shortest range of all the radios we use so it is important to remember it can only be used to contact nearby elements. The 343 comes equipped with a 2.5in antenna, a max output of 50mW and a range of up to 500 metres in rural terrain. The 343 operates on an Ultra High Frequency. This means they cannot transmit or receive messages from a 152 or 148. Below is an image of the 343 as it looks in-game. | ||
[[File:Heldradio.jpg|center|482x482px]] | |||
[[File: | |||
| Line 44: | Line 40: | ||
=== Radio Channels === | === Radio Channels === | ||
''' | '''Section Radio Frequencies:''' | ||
Please refer to the Groups Page for the radio frequencies. | |||
=== Radio Procedures & Prowords=== | === Radio Procedures & Prowords=== | ||
[[File:D90958430728b867af17e012e2226a11.png| | [[File:D90958430728b867af17e012e2226a11.png|right]] | ||
Before making a transmission, remember the following:<br> | Before making a transmission, remember the following:<br> | ||
| Line 119: | Line 91: | ||
|- | |- | ||
|| WILCO || I have received your signal, understand it, and will comply. To be used only by the addressee. Since the meaning of ROGER is included in that of WILCO, the two prowords are never used together. | || WILCO || I have received your signal, understand it, and will comply. To be used only by the addressee. Since the meaning of ROGER is included in that of WILCO, the two prowords are never used together. | ||
|- | |||
|| REPEAT || This is for Artillery to repeat the last fire mission. Use SAY AGAIN to avoid confusion | |||
|} | |} | ||
=== Default Hotkeys === | === Default Hotkeys === | ||
By default, your | By default, your keybinds for communication are set to the following: | ||
''' | '''G''' - Radio Selection - opens the radio wheel.<br> | ||
''' | '''Scroll Up + Down''' - Adjust Frequency - changes channel frequency by .5 increments. | ||
''' | '''R''' - Power Switch - toggles radio power. | ||
''' | '''T''' (Hold) - Talk - speaks locally but only when key is held.<br> | ||
'''T''' (Double Press) - Talk - speaks locally until key is double pressed again.<br> | |||
''' | '''CAPS''' (Hold) - Talk over Radio - speaks both locally and over radio but only when key is held.<br> | ||
''' | '''CAPS''' (Double Press) - Talk over Radio - speaks both locally and over radio until key is double pressed again.<br> | ||
'''LCTRL+CAPS''' (Hold) - Talk over long-range radio - speaks over the long-range radio but only when keys are held. | |||
== Direct Communication == | == Direct Communication == | ||
Direct communication is any communication done between two or more players in real time. Direct communication is a skill that must be developed in order to relay information between fireteam members more efficiently and ultimately increase surviveability. | Direct communication is any communication done between two or more players in real time. Direct communication is a skill that must be developed in order to relay information between fireteam members more efficiently and ultimately increase surviveability. | ||
=== | === Reforger Voice Carrying === | ||
Reforger uses an in-game communication system which includes a system where how loudly you speak into your mic determines how far your voice carries in-game. Keep this in mind as the players can and will react to you based on what they can hear, especially as Reforger has very sensitive voice activity. | |||
Keep | |||
=== Contact Calls === | === Contact Calls === | ||
| Line 168: | Line 131: | ||
Marking is any visual form of identification across one or more mediums. This includes marks on the global map, spray painting doors after buildings have been cleared, or even lasing targets with a laser designator. | Marking is any visual form of identification across one or more mediums. This includes marks on the global map, spray painting doors after buildings have been cleared, or even lasing targets with a laser designator. | ||
=== Map | === Map Marking === | ||
There are two map | There are two kinds of map marking: '''Custom Markers''' and '''Military Markers'''. Every mark on the map must be color-coded based on who the mark is for. There are also specific techniques that platoon and squad leaders must use when developing plans.[[File:Map.jpg|frameless|956x956px]] | ||
[[File: | |||
==== | ==== Custom Markers: ==== | ||
[[File: | Custom Markers can be used to mark Waypoints on the map, landing zones and other POIs such as minefields.[[File:Custommarkers zoomed.jpg|frameless|507x507px]] | ||
[[File:Tags.png|This example shows the marker on the map, with the information you set on the right image. In this example, this is an Enemy Commander marked with the OPFOR Faction, Land Category and Mobile Command Unit Type.|thumb|199x199px]] | |||
=== | ==== Military Markers: ==== | ||
[[File:Militarymarkers_zoomed.jpg|center|frameless|504x504px]] | |||
Military Markers can be used to mark confirmed friendly and enemy installations as well as enemy infantry and other contacts. | |||
==== Marking Color Code ==== | ==== Marking Color Code ==== | ||
When marking the map, it is important to use the correct color to indicate which element the mark being added is addressed to. | When marking the map, it is important to use the correct color to indicate which element the mark being added is addressed to. With the inclusion of Military Markers, it is important to include either the group it is addressed to or if it's a platoon-wide marker. Below is a list of the color code used for each element. | ||
<pre> | <pre> | ||
| Line 193: | Line 155: | ||
Everyone - Black | Everyone - Black | ||
</pre> | </pre> | ||
==== Icons ==== | ==== Icons ==== | ||
Icons are used for specific points such as dismounting, convoy start points, or even mortar/air strike requests. Icon example: | Icons are used for specific points such as dismounting, convoy start points, or even mortar/air strike requests. Icon example: | ||
[[File: | [[File:Map3.png|center|900x900px|In this example, you can see that there are several icons marking out a landing zone and 6 waypoints, 3 for two different elements to use, both sets of waypoints have a different color and highlight a different way of writing/differentiating them from each other.]] | ||
List of icons: | |||
[[File: | [[File:ICONSALL.png|center|frameless|486x486px|The above shows all 3 of the in-game menus for selecting different types of icon to use when marking.]] | ||
==== EI Map Marks ==== | ==== EI Map Marks ==== | ||
EI: Enemy Infantry | EI: Enemy Infantry | ||
Every "EI call" must be marked on the map once they are pointed out. This allows for direct identification on all levels of command based on color-coded marks | Every "EI call" must be marked on the map once they are pointed out. This allows for direct identification on all levels of command based on color-coded marks. | ||
In this example, | In this example, 2nd Section has marked spotted EI and has marked it, this example uses both the custom and military marker: | ||
[[File: | [[File:EI.png|center|346x346px]] | ||
=== Command Map Planning === | === Command Map Planning === | ||
| Line 219: | Line 176: | ||
==== Convoy ==== | ==== Convoy ==== | ||
[[File: | [[File:Convoy1.png|center|900x900px]] | ||
Also note that '''ALL''' convoy planned-missions must have a Mount Order defined prior to mission start. A stand MO looks like this: | Also note that '''ALL''' convoy planned-missions must have a Mount Order defined prior to mission start. A stand MO looks like this: | ||
[[File: | [[File:Convoy2.png|center|801x801px]] | ||
==== Infantry ==== | ==== Infantry ==== | ||
[[File: | [[File:InfantryNEW.png|center|826x826px]] | ||
==== Full Plans ==== | ==== Full Plans ==== | ||
| Line 242: | Line 198: | ||
For non-JTACs, mark the target on the map w/ a descriptor, and then communicate with higher elements to make a request for a strike on that target. | For non-JTACs, mark the target on the map w/ a descriptor, and then communicate with higher elements to make a request for a strike on that target. | ||
For JTACs, see [ | For JTACs, see [https://coalitiongroup.net/wiki/index.php/Vehicle/Aircraft_Operations#JTAC-Aircraft_Operations JTAC-Aircraft Operations]. | ||
[[File:airstrike.png|center|900px]] | [[File:airstrike.png|center|900px]] | ||
| Line 253: | Line 209: | ||
Prowords are words used in radio Procedure as a form of shorthand. | Prowords are words used in radio Procedure as a form of shorthand. | ||
======General Terms====== | |||
{| class="wikitable" style="text-align:center;" | {| class="wikitable" style="text-align:center;" | ||
|+ | |+ | ||
! Acronym | ! Acronym | ||
! Definition | ! Definition | ||
! Notes | ! Notes | ||
|- | |- | ||
| style="text-align:left;" |AO|| Area of Operations | | style="text-align:left;" |AO|| Area of Operations|| The specific part of the map you are limited to | ||
|- | |- | ||
| style="text-align:left;" | | | style="text-align:left;" |Chalk||A Group of soldiers grouped for air movement|| Often used to organize what landing wave a group is in | ||
|- | |- | ||
| style="text-align:left;" |CQC|| Close Quarters Combat | | style="text-align:left;" |CQB|| Close Quarters Battle|| Mostly pertaining to fighting inside buildings | ||
|- | |||
| style="text-align:left;" |CQC|| Close Quarters Combat|| Same as above | |||
|- | |- | ||
| style="text-align:left;" |MOUT|| Military Operations in Urban Terrain|| School of tactics related to fighting in and around Cities | | style="text-align:left;" |MOUT|| Military Operations in Urban Terrain|| School of tactics related to fighting in and around Cities | ||
|- | |- | ||
| style="text-align:left;" |ROE|| Rules Of Engagement | | style="text-align:left;" |PID|| Positive Identification|| Make sure you know who or what you are looking at | ||
|- | |||
| style="text-align:left;" |ROE|| Rules Of Engagement|| How and when you are allowed to fight | |||
|- | |||
| style="text-align:left;" |ERA|| Explosive Reactive Armor|| A system used on vehicles to negate or reduce effectiveness of certain munitions | |||
|} | |} | ||
---- | ---- | ||
====== Infantry Roles And Assets ====== | |||
{| class="wikitable" style="text-align:center;" | {| class="wikitable" style="text-align:center;" | ||
|+ | |+ | ||
! Acronym | ! Acronym | ||
! Definition | ! Definition | ||
! Notes | ! Notes | ||
|- | |- | ||
| style="text-align:left;" |ASL || Alpha Squad Leader | | style="text-align:left;" |ASL || Alpha Squad Leader|| | ||
|- | |- | ||
| style="text-align:left;" |AAR || Assistant Auto-Rifleman || Spotter and ammo bearer for AR | | style="text-align:left;" |AAR || Assistant Auto-Rifleman || Spotter and ammo bearer for AR | ||
|- | |- | ||
| style="text-align:left;" |AR || Automatic Rifleman/Rifle | | style="text-align:left;" |AR || Automatic Rifleman/Rifle|| | ||
|- | |||
| style="text-align:left;" |BSL || Bravo Squad Leader|| | |||
|- | |- | ||
| style="text-align:left;" | | | style="text-align:left;" |COY || Company|| | ||
|- | |- | ||
| style="text-align:left;" | | | style="text-align:left;" |CSL || Charlie Squad Leader|| | ||
|- | |- | ||
| style="text-align:left;" | | | style="text-align:left;" |FAC||Forward Air Controller || Spots for and directs Air Assets | ||
|- | |- | ||
| style="text-align:left;" |FO ||Forward Observer || Spots for and directs Artillery assets | | style="text-align:left;" |FO ||Forward Observer || Spots for and directs Artillery assets | ||
| Line 294: | Line 260: | ||
| style="text-align:left;" |FT || Fireteam || 6 man element. 2 to a squad. | | style="text-align:left;" |FT || Fireteam || 6 man element. 2 to a squad. | ||
|- | |- | ||
| style="text-align:left;" |FTL || Fireteam Leader | | style="text-align:left;" |FTL || Fireteam Leader|| | ||
|- | |- | ||
| style="text-align:left;" |GREN || Grenadier || Carries grenade launcher or extra grenades | | style="text-align:left;" |GREN || Grenadier || Carries grenade launcher or extra grenades | ||
| Line 302: | Line 268: | ||
| style="text-align:left;" |HMG || Heavy Machinegun || Typically A .50 caliber Machinegun | | style="text-align:left;" |HMG || Heavy Machinegun || Typically A .50 caliber Machinegun | ||
|- | |- | ||
| style="text-align:left;" |INF || Infantry | | style="text-align:left;" |INF || Infantry|| | ||
|- | |- | ||
| style="text-align:left;" |JTAC || Joint Terminal Attack Controller || Spots for and directs Air assets | | style="text-align:left;" |JTAC || Joint Terminal Attack Controller || Spots for and directs Air assets (NATO term for FAC) | ||
|- | |- | ||
| style="text-align:left;" |LAT || Light Anti-Tank || Man portable Disposable rocket launchers | | style="text-align:left;" |LAT || Light Anti-Tank || Man portable Disposable rocket launchers | ||
| Line 310: | Line 276: | ||
| style="text-align:left;" |MMG || Medium Machinegun || Typically a belt fed .30 cal (7.62mm) Machinegun | | style="text-align:left;" |MMG || Medium Machinegun || Typically a belt fed .30 cal (7.62mm) Machinegun | ||
|- | |- | ||
| style="text-align:left;" |MRT || Mortar Team | | style="text-align:left;" |MRT || Mortar Team|| | ||
|- | |- | ||
| style="text-align:left;" |MO || Medical Officer|| Manages the PLT Field Hospital | | style="text-align:left;" |MO || Medical Officer|| Manages the PLT Field Hospital | ||
|- | |- | ||
| style="text-align:left;" |PL || Platoon or Platoon lead | | style="text-align:left;" |PL || Platoon or Platoon lead|| | ||
|- | |- | ||
| style="text-align:left;" |PLT || Platoon | | style="text-align:left;" |PLT || Platoon|| | ||
|- | |- | ||
| style="text-align:left;" |RAT|| Rifleman Anti-Tank || Carries FT's anti tank | | style="text-align:left;" |RAT|| Rifleman Anti-Tank || Carries FT's anti tank | ||
| Line 322: | Line 288: | ||
----- | ----- | ||
====== Radio Communications ====== | |||
{| class="wikitable" style="text-align:center;" | {| class="wikitable" style="text-align:center;" | ||
|+ | |+ | ||
! Acronyms & Prowords | ! Acronyms & Prowords | ||
! Definition | ! Definition | ||
| Line 334: | Line 302: | ||
| style="text-align:left;" |Black || Expended resource|| "A2, black on ammo" | | style="text-align:left;" |Black || Expended resource|| "A2, black on ammo" | ||
|- | |- | ||
| style="text-align:left;" |CallSign || A radio codename | | style="text-align:left;" |CallSign || A radio codename|| | ||
|- | |- | ||
| style="text-align:left;" |ETA || Estimated Time of Arrival || "Reinforcements ETA 10 Mikes" | | style="text-align:left;" |ETA || Estimated Time of Arrival || "Reinforcements ETA 10 Mikes" | ||
| Line 340: | Line 308: | ||
| style="text-align:left;" |Green || Full on resource || "Green across the board, ready to fight" | | style="text-align:left;" |Green || Full on resource || "Green across the board, ready to fight" | ||
|- | |- | ||
| style="text-align:left;" |Mike || Minute | | style="text-align:left;" |Mike || Minute|| | ||
|- | |- | ||
| style="text-align:left;" |Net || Network || A radio channel | | style="text-align:left;" |Net || Network || A radio channel | ||
|- | |- | ||
| style="text-align:left;" |Oscar Mike || On The Move | | style="text-align:left;" |Oscar Mike || On The Move|| | ||
|- | |- | ||
| style="text-align:left;" |Over ||Proword used to end a message while asking for a reply | | style="text-align:left;" |Over ||Proword used to end a message while asking for a reply|| | ||
|- | |- | ||
| style="text-align:left;" |Out || Proword used to mark the end of a transmission | | style="text-align:left;" |Out || Proword used to mark the end of a transmission|| | ||
|- | |- | ||
| style="text-align:left;" |Red || Critically Low on Resource|| "Red on Bandages" | | style="text-align:left;" |Red || Critically Low on Resource|| "Red on Bandages" | ||
|- | |- | ||
| style="text-align:left;" |Radio Check|| Please confirm my radio is working and you can hear me | | style="text-align:left;" |Radio Check|| Please confirm my radio is working and you can hear me|| | ||
|- | |- | ||
| style="text-align:left;" |SITREP|| Situational Report || Either giving or asking for a report | | style="text-align:left;" |SITREP|| Situational Report || Either giving or asking for a report | ||
|- | |- | ||
| style="text-align:left;" |Station|| Your Radio | | style="text-align:left;" |TIC|| Troops In Contact || A short concise way to report initial contact "Pl, Alpha. TIC east out" | ||
|- | |||
| style="text-align:left;" |Station|| Your Radio|| | |||
|- | |- | ||
| style="text-align:left;" |Yellow|| Have used a small amount of resource|| Not in immediate need of resupply | | style="text-align:left;" |Yellow|| Have used a small amount of resource|| Not in immediate need of resupply | ||
| Line 362: | Line 332: | ||
---- | ---- | ||
====== Map Markers & Briefing ====== | |||
{| class="wikitable" style="text-align:center;" | {| class="wikitable" style="text-align:center;" | ||
|+ | |+ | ||
! Acronym | ! Acronym | ||
! Definition | ! Definition | ||
! Notes | ! Notes | ||
|- | |- | ||
| style="text-align:left;" |AO|| Area of Operations | | style="text-align:left;" |AO|| Area of Operations|| | ||
|- | |- | ||
| style="text-align:left;" |ASR|| Alternate Supply Route|| The veins that branch from an MSR | | style="text-align:left;" |ASR|| Alternate Supply Route|| The veins that branch from an MSR | ||
|- | |- | ||
| style="text-align:left;" |BOF|| Base Of Fire | | style="text-align:left;" |BOF|| Base Of Fire|| An element meant to provide Fire Superiority | ||
|- | |- | ||
| style="text-align:left;" |CP|| Command Post | | style="text-align:left;" |CP|| Command Post|| | ||
|- | |- | ||
| style="text-align:left;" |CCP|| Casualty Collection Point | | style="text-align:left;" |CCP|| Casualty Collection Point|| | ||
|- | |- | ||
| style="text-align:left;" |COP|| Combat Outpost || Small fortified outpost relies on supply and patrols from FOB | | style="text-align:left;" |COP|| Combat Outpost || Small fortified outpost relies on supply and patrols from FOB | ||
|- | |||
| style="text-align:left;" |DP ||Dismount Point|| For troops mounted in land vehicles to leave the vehicle | |||
|- | |- | ||
| style="text-align:left;" |DZ|| Drop Zone || You parachute here | | style="text-align:left;" |DZ|| Drop Zone || You parachute here | ||
|- | |- | ||
| style="text-align:left;" |EA|| Enemy Armor | | style="text-align:left;" |EA|| Enemy Armor|| | ||
|- | |- | ||
| style="text-align:left;" |EI|| Enemy Infantry | | style="text-align:left;" |EI|| Enemy Infantry|| | ||
|- | |- | ||
| style="text-align:left;" |FH|| Field Hospital | | style="text-align:left;" |FH|| Field Hospital|| | ||
|- | |- | ||
| style="text-align:left;" |FOB|| Forward Operations Base || Large Fortified forward base | | style="text-align:left;" |FOB|| Forward Operations Base || Large Fortified forward base | ||
| Line 392: | Line 366: | ||
| style="text-align:left;" |HVT|| High Value Target || Valuable enemy to Kill or Capture | | style="text-align:left;" |HVT|| High Value Target || Valuable enemy to Kill or Capture | ||
|- | |- | ||
| style="text-align:left;" |HQ|| Headquarters | | style="text-align:left;" |HQ|| Headquarters|| | ||
|- | |- | ||
| style="text-align:left;" | | | style="text-align:left;" |LDA|| Linear Danger Area || A corridor of death that exposes your flank. Ig: A road you need to cross | ||
|- | |- | ||
| style="text-align:left;" |LOA|| Limit Of Advance|| The furthest extent of an assault or movement | | style="text-align:left;" |LOA|| Limit Of Advance|| The furthest extent of an assault or movement | ||
|- | |||
| style="text-align:left;" |LZ|| Landing zone || Where you land your boats or helicopters | |||
|- | |- | ||
| style="text-align:left;" |MSR|| Main Supply Route|| The main artery into an AO Usually a major highway or the largest road | | style="text-align:left;" |MSR|| Main Supply Route|| The main artery into an AO Usually a major highway or the largest road | ||
| Line 404: | Line 380: | ||
| style="text-align:left;" |Phase|| A codenamed section of the overall plan ||Not to be executed until command uses the codeword | | style="text-align:left;" |Phase|| A codenamed section of the overall plan ||Not to be executed until command uses the codeword | ||
|- | |- | ||
| style="text-align:left;" |RP|| Rally Point / Regroup Point | | style="text-align:left;" |RP|| Rally Point / Regroup Point|| A point at which units form up after being separated from one another | ||
|- | |||
| style="text-align:left;" |SA/SP/STAGE||Staging point || A point at which a unit forms up for to get ready to move or attack | |||
|- | |- | ||
| style="text-align:left;" |TOC|| Tactical Operations center | | style="text-align:left;" |TOC|| Tactical Operations center|| | ||
|- | |- | ||
| style="text-align:left;" |TRP|| Target Reference Point || A terrain or building feature that aids in navigation and or talking support onto a target | | style="text-align:left;" |TRP|| Target Reference Point || A terrain or building feature that aids in navigation and or talking support onto a target | ||
|- | |- | ||
| style="text-align:left;" |VIC / VEH|| Vehicle | | style="text-align:left;" |VIC / VEH|| Vehicle|| | ||
|- | |- | ||
| style="text-align:left;" |VIP|| Very Important Person || An ally we need to protect or rescue | | style="text-align:left;" |VIP|| Very Important Person || An ally we need to protect or rescue | ||
| Line 419: | Line 397: | ||
---- | ---- | ||
====== Vehicles Roles and Assets ====== | |||
{| class="wikitable" style="text-align:center;" | {| class="wikitable" style="text-align:center;" | ||
! Acronym | ! Acronym | ||
! Definition | ! Definition | ||
| Line 428: | Line 406: | ||
|- | |- | ||
| style="text-align:left;" |AAA / Triple A|| Anti Aircraft Artillery|| Cannons meant to shoot at aircraft | | style="text-align:left;" |AAA / Triple A|| Anti Aircraft Artillery|| Cannons meant to shoot at aircraft | ||
|- | |||
| style="text-align:left;" |AAV / AAVP|| Assault Amphibious Vehicle (Personnel) || A Seaworthy APC | |||
|- | |- | ||
| style="text-align:left;" |AH|| Attack Helicopter|| A helicopter with CAS capability | | style="text-align:left;" |AH|| Attack Helicopter|| A helicopter with CAS capability | ||
| Line 433: | Line 413: | ||
| style="text-align:left;" |APC|| Armored Personal Carrier || A Lightly Armored vehicle meant to transport troops, occasionally armed with machine guns. M113 and BTRs are examples | | style="text-align:left;" |APC|| Armored Personal Carrier || A Lightly Armored vehicle meant to transport troops, occasionally armed with machine guns. M113 and BTRs are examples | ||
|- | |- | ||
| style="text-align:left;" |ARTY|| Artillery | | style="text-align:left;" |ARTY|| Artillery|| | ||
|- | |- | ||
| style="text-align:left;" |CAS|| Close Air Support | | style="text-align:left;" |CAS|| Close Air Support|| | ||
|- | |- | ||
| style="text-align:left;" |Fast Mover|| A Jet Fighter/Bomber | | style="text-align:left;" |Fast Mover|| A Jet Fighter/Bomber|| | ||
|- | |- | ||
| style="text-align:left;" |FW|| Fixed Wing|| A Plane | | style="text-align:left;" |FW|| Fixed Wing|| A Plane | ||
| Line 453: | Line 433: | ||
| style="text-align:left;" |SPG|| Self Propelled Gun|| A howitzer on tracks or wheels. | | style="text-align:left;" |SPG|| Self Propelled Gun|| A howitzer on tracks or wheels. | ||
|- | |- | ||
| style="text-align:left;" |TH|| Transport Helicopter | | style="text-align:left;" |TH|| Transport Helicopter|| | ||
|- | |- | ||
| style="text-align:left;" |Technical|| An improvised combat vehicle|| Normally a pickup truck with a .50cal MG bolted to it. | | style="text-align:left;" |Technical|| An improvised combat vehicle|| Normally a pickup truck with a .50cal MG bolted to it. | ||
|- | |- | ||
| style="text-align:left;" | | | style="text-align:left;" |UGV|| Unmanned Ground Vehicle|| | ||
|- | |- | ||
| style="text-align:left;" |UAV|| Unmanned Aerial Vehicle | | style="text-align:left;" |UAV|| Unmanned Aerial Vehicle|| | ||
|} | |} | ||
---- | |||
====== Munitions ====== | |||
{| class="wikitable" style="text-align:center;" | |||
! Acronym | |||
! Definition | |||
! Notes | |||
|- | |||
| style="text-align:left;" |AA|| Anti-Air|| | |||
|- | |||
| style="text-align:left;" |AB|| Air Burst|| Normally Anti-Personnel | |||
|- | |||
| style="text-align:left;" |AP|| Armor Piercing || Anti-Personnel if used in most rocket launchers | |||
|- | |||
| style="text-align:left;" |APDS|| Armor Piercing Discarding Sabot|| A very high velocity moving sub caliber dart made of dense material | |||
|- | |||
| style="text-align:left;" |APFSDS|| Armor Piercing Fin Stabilized Discarding Sabot|| Same as above but with fins | |||
|- | |||
| style="text-align:left;" |ATGM|| Anti-Tank Guided Missile|| Anti-Tank missile that either locks on or is manually guided | |||
|- | |||
| style="text-align:left;" |Canister|| Canister full of ball bearings or Flechettes|| Anti personnel | |||
|- | |||
| style="text-align:left;" |Cluster|| Releases a Cluster of smaller bombs|| Airburst to disperse bomblets or mines | |||
|- | |||
| style="text-align:left;" |HEAA|| High Explosive Anti-Armor|| The Marines like their own terms. Its HEAT damn it. | |||
|- | |||
| style="text-align:left;" |HEAT|| High Explosive Anti-Tank || A shaped charge meant to penetrate armor | |||
|- | |||
| style="text-align:left;" |HEDP|| High Explosive Dual Purpose|| A mix of HEAT and HEF | |||
|- | |||
| style="text-align:left;" |HEF|| High Explosive Fragmentation|| HE shell filled with or meant to cause shrapnel | |||
|- | |||
| style="text-align:left;" |HET|| High Explosive Timed|| HE shell that explodes a pre-determined time after impact, can cause airburst | |||
|- | |||
| style="text-align:left;" |T-HEAT / Tandem|| Tandem High Explosive Anti-Tank|| Round with two HEAT charges to defeat reactive armor | |||
|- | |||
| style="text-align:left;" |TB / Thermo|| Thermobaric|| A fuel air bomb. Anti-Personnel works well if it goes off inside fortifications | |||
|- | |||
| style="text-align:left;" |ILLUM|| Illumination || Flares that turn night into day | |||
Latest revision as of 22:24, 24 June 2024
Communication is top priority whether you're a rifleman or a platoon leader. Remember, during a session, if you're not shooting or moving, you should be communicating.
Radio Communication
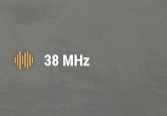
Through the in-game radio system built directly into Reforger, we are able to have multiple people with different radios to talk on the same channel at the same time. This means we have to practice certain protocols to ensure information flows up and down the chain of command properly. By default the Caps Lock key allows you to transmit over the radio. Below is an image of the message that will appear on the right of your screen when you are transmitting over the radio.
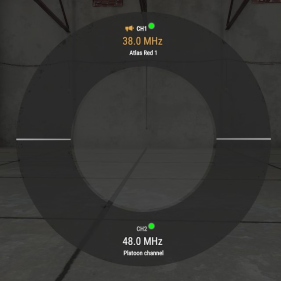
In addition to letting you know that you are transmitting this message also display some useful information. It shows which frequency you are broadcasting on (in this case 38 MHz). This is important to note so you are transmitting on the correct channel using the correct radio. Before the mission starts it is worth checking your gear to see which radios you have. If you have to change the radio/channel you are broadcasting on, you can open and close the radio wheel by using the hotkey G. To the right is an image of the radio wheel with 2 channels being available, in this example you can see that the two available channels are CH1 - 38MHz which is Atlas Red 1(This is the name of the group and therefore changes depending on what the group is called) and CH2 - 48MHz which is Platoon channel.
Radios & Radio Channels
All radio nets are listed in the Group Menu. All sections have their own private frequency whilst inter-section communication is handled on the platoon-wide channel accessible by all section leads and the platoon commander.
Short-Range AN/PRC-343:
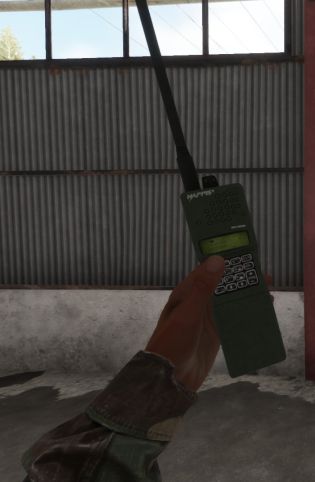
The AN/PRC-343 or 343 is most basic radio we use. It is mostly used for communication between Fireteam leaders. Almost every position uses a 343 to communicate and it is an important radio to become familiar with. The 343 has the shortest range of all the radios we use so it is important to remember it can only be used to contact nearby elements. The 343 comes equipped with a 2.5in antenna, a max output of 50mW and a range of up to 500 metres in rural terrain. The 343 operates on an Ultra High Frequency. This means they cannot transmit or receive messages from a 152 or 148. Below is an image of the 343 as it looks in-game.
AN/PRC-148
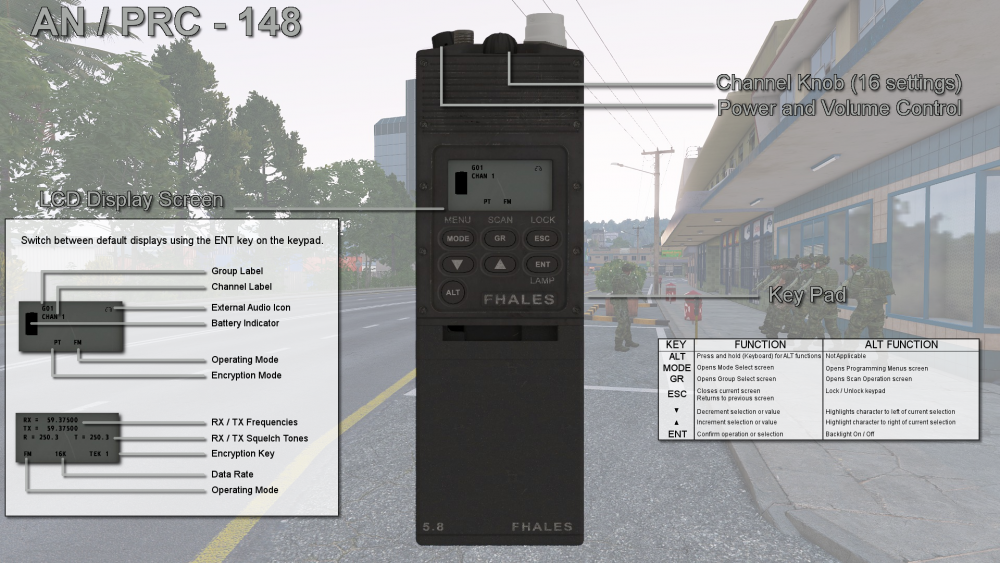
The AN/PRC-148, a more advanced radio is generally used by a squad leader and specialty (ex: engineering) leader to communicate with command. The 148 uses pre-programmed channels like the 343 but with a much longer range. It has the same specifications as the 152.
Use the default key to open up your 148 and you are left with that screen. To change channels, once again you have to press the top middle button. To change volume, simply click the button on the leftmost side.
AN/PRC-152
152s are currently not directly issued in the framework, though may be found mounted in some vehicle racks
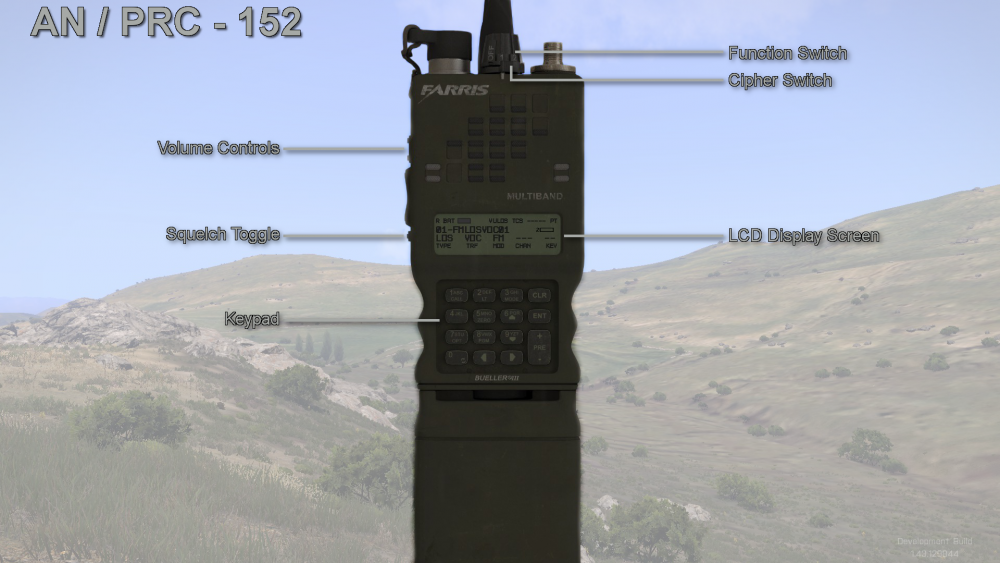
The AN/PRC-152 handled by the squad leader to communicate with command. It uses predefined, pre-programmed channels like the 343 and 148, but is much more powerful than the 343. It functions on a Ultra High Frequency, has an output of 5W, and a range of up to ten kilometres in ideal conditions.
The 152 has two controllabe buttons that you need to worry about: the top middle one, which changes channels, and the buttons at the side which are used to adjust volume. To change a channel, simply click on the top middle button (left to go up a channel, right to go back one). To change volume, you do the same.
Radio Channels
Section Radio Frequencies:
Please refer to the Groups Page for the radio frequencies.
Radio Procedures & Prowords
Before making a transmission, remember the following:
Accuracy: Is what you're saying solid information? When reporting contact, ensure that you have double checked the direction and distance of the contact.
Brevity: KISS - Keep It Short and Simple, or Keep It Simple Stupid. Convey as much information as necessary in as few words as possible.
Clarity: Make sure that you speak slowly, steadily and as clearly as you can. Do your best to remain calm under pressure.
An example:
Scenario: You are Alpha 1 Fireteam Leader and you see enemies in front of your team, but they're not aware of your presence.
Rather than a message such as:
Alpha Squad Lead, this is Alpha 1, we uh, see about a squad size or even maybe two squads of infantry in the open over here and we need to know if we should shoot them or wait. So far, I don't think they uh, have noticed us and we're prone on the hill here.
A proper message with brevity would be:
ASL, this is A1, we have an EI squad soft contact 300 meters from us at the treeline north. Check map for "EI" mark.
Some good key words to remember are listed in the table below. Use them to limit the time you're on net.
| Proword | Meaning |
|---|---|
| CORRECTION | An error has been made in this transmission. Transmission will continue with the last word correctly transmitted. |
| I SAY AGAIN | I am repeating transmission or portion indicated. |
| OUT | This is the end of my transmission to you and no answer is required or expected. |
| OVER | This is the end of my transmission to you and a response is necessary. Go ahead; transmit. |
| BREAK | I hereby indicate the separation of the text from other portions of the message. |
| ROGER | I have received your last transmission satisfactorily, and loud and clear. |
| SAY AGAIN | Repeat all of your last transmission. |
| SEND | I have received your initial call; pass on the rest of your message. |
| THIS IS | This transmission is from the station whose designator/callsign immediately follows. |
| WILCO | I have received your signal, understand it, and will comply. To be used only by the addressee. Since the meaning of ROGER is included in that of WILCO, the two prowords are never used together. |
| REPEAT | This is for Artillery to repeat the last fire mission. Use SAY AGAIN to avoid confusion |
Default Hotkeys
By default, your keybinds for communication are set to the following:
G - Radio Selection - opens the radio wheel.
Scroll Up + Down - Adjust Frequency - changes channel frequency by .5 increments.
R - Power Switch - toggles radio power.
T (Hold) - Talk - speaks locally but only when key is held.
T (Double Press) - Talk - speaks locally until key is double pressed again.
CAPS (Hold) - Talk over Radio - speaks both locally and over radio but only when key is held.
CAPS (Double Press) - Talk over Radio - speaks both locally and over radio until key is double pressed again.
LCTRL+CAPS (Hold) - Talk over long-range radio - speaks over the long-range radio but only when keys are held.
Direct Communication
Direct communication is any communication done between two or more players in real time. Direct communication is a skill that must be developed in order to relay information between fireteam members more efficiently and ultimately increase surviveability.
Reforger Voice Carrying
Reforger uses an in-game communication system which includes a system where how loudly you speak into your mic determines how far your voice carries in-game. Keep this in mind as the players can and will react to you based on what they can hear, especially as Reforger has very sensitive voice activity.
Contact Calls
A contact is anything unknown that you're able to visually or audibly identify as being present. A contact is not specifically an enemy vehicle or infantry, so make sure you always identify prior in order to avoid friendly fire incidents. Examples of contact calls:
I got audio on something tracked to the north in the treeline. Unknown distance
Contact, infantry moving in the trees to the southwest, 300 meters.
Marking
Marking is any visual form of identification across one or more mediums. This includes marks on the global map, spray painting doors after buildings have been cleared, or even lasing targets with a laser designator.
Map Marking
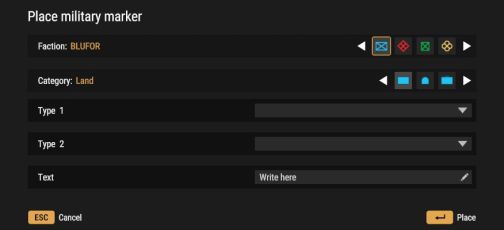
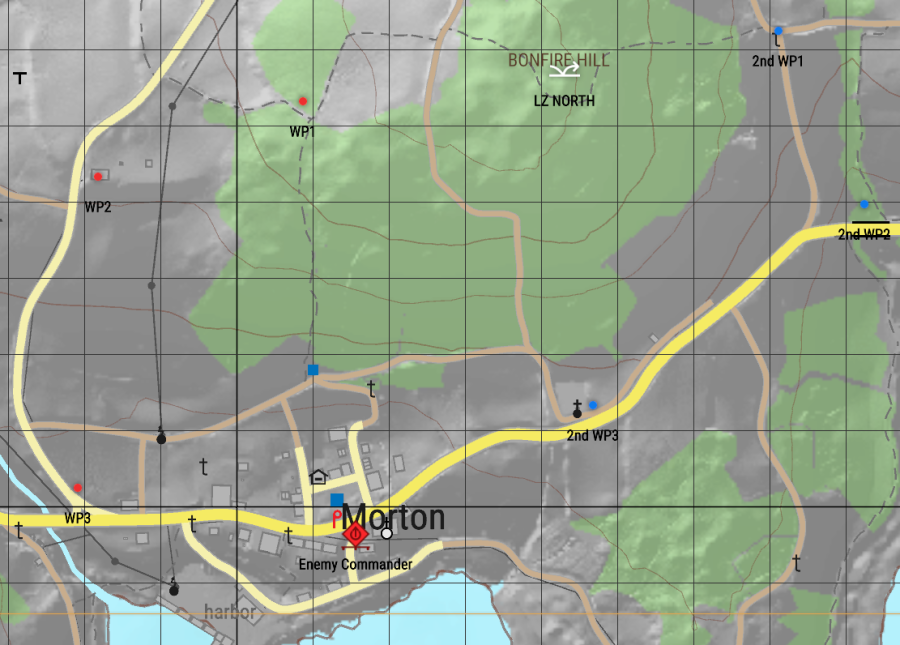
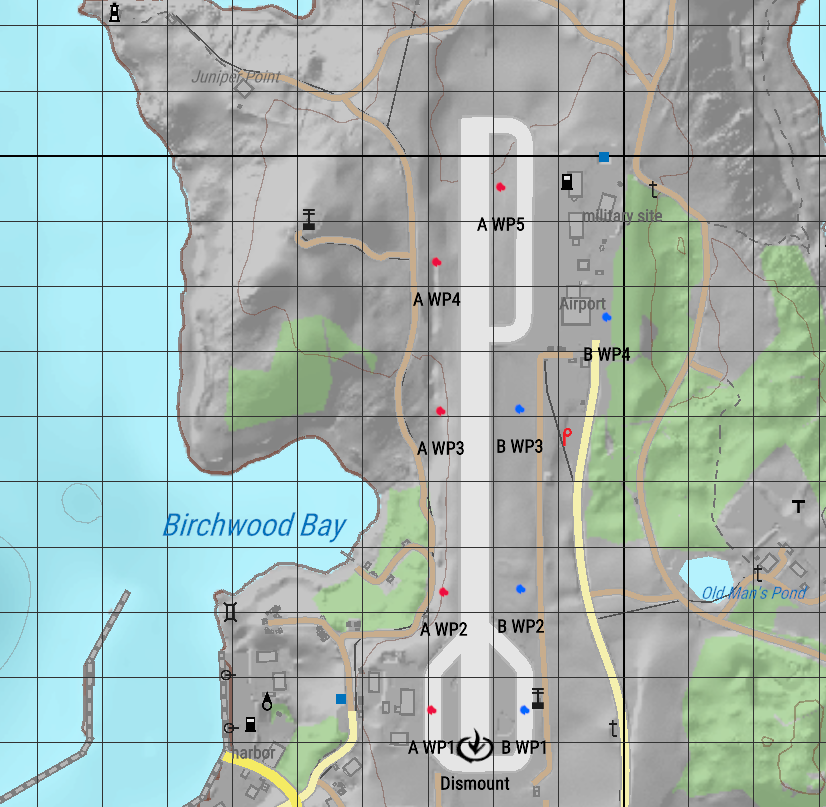
There are two kinds of map marking: Custom Markers and Military Markers. Every mark on the map must be color-coded based on who the mark is for. There are also specific techniques that platoon and squad leaders must use when developing plans.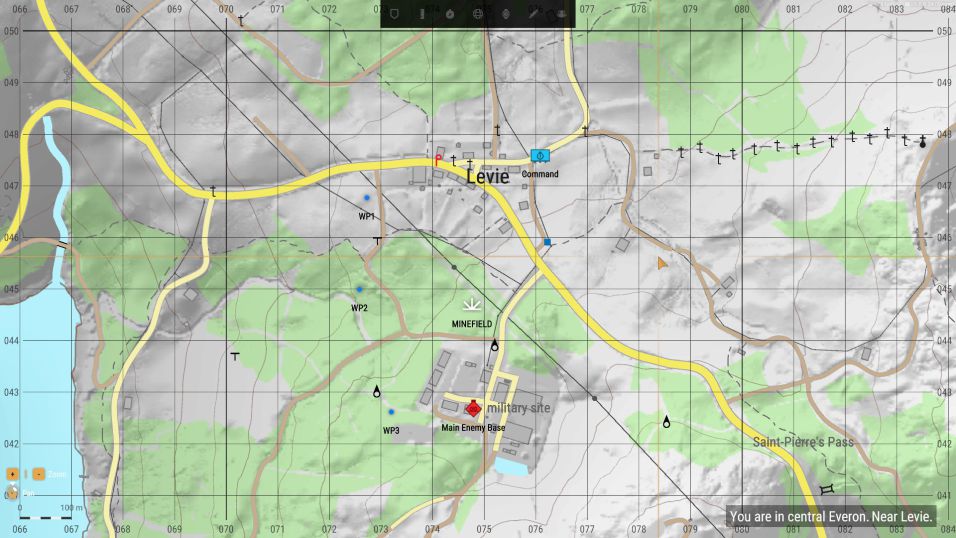
Custom Markers:
Custom Markers can be used to mark Waypoints on the map, landing zones and other POIs such as minefields.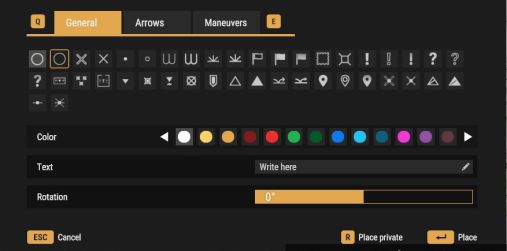
Military Markers:
Military Markers can be used to mark confirmed friendly and enemy installations as well as enemy infantry and other contacts.
Marking Color Code
When marking the map, it is important to use the correct color to indicate which element the mark being added is addressed to. With the inclusion of Military Markers, it is important to include either the group it is addressed to or if it's a platoon-wide marker. Below is a list of the color code used for each element.
Alpha - Red
Bravo - Blue
Charlie - Green
Individual Specialties (MMG, MTR, MAT) - Purple
Command - Yellow
Armor - Orange
Everyone - Black
Icons
Icons are used for specific points such as dismounting, convoy start points, or even mortar/air strike requests. Icon example:
List of icons:
EI Map Marks
EI: Enemy Infantry
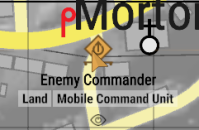
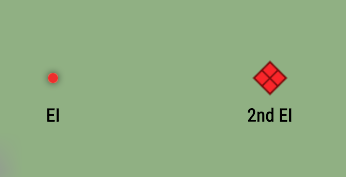
Every "EI call" must be marked on the map once they are pointed out. This allows for direct identification on all levels of command based on color-coded marks.
In this example, 2nd Section has marked spotted EI and has marked it, this example uses both the custom and military marker:
Command Map Planning
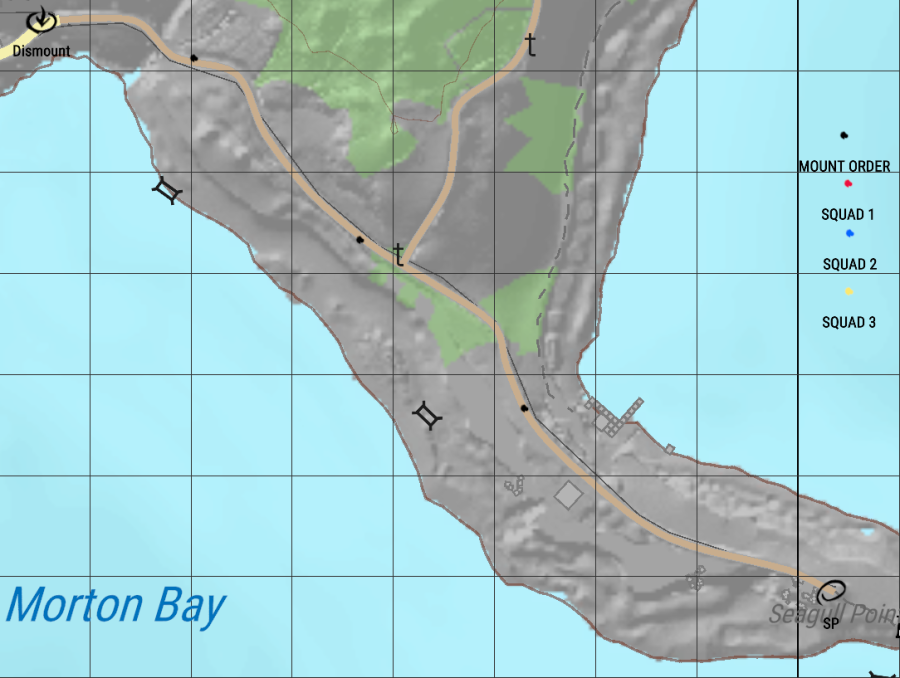
Regardless of who is in command at the time of mission start, all mission commanders need to follow the same type of planning system. This ensures that all players have a streamlined and structured experience without the need to adapt to different leadership styles as a whole. Failure to do so will result in commanding rights being revoked. The following are examples of full plans.
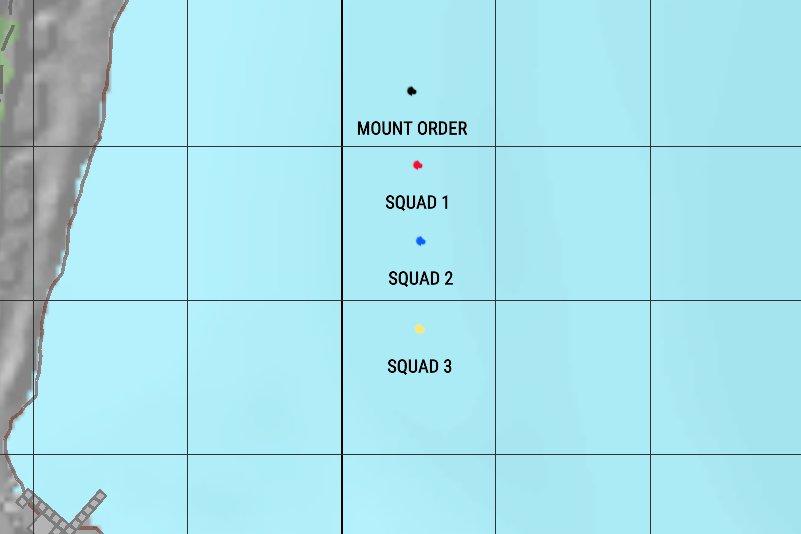
Convoy
Also note that ALL convoy planned-missions must have a Mount Order defined prior to mission start. A stand MO looks like this:
Infantry
Full Plans
Convoy with Infantry Dismount/Assault
Calls for Fire
Calls for fire will always be directed by a Joint Terminal Attack Controller(JTAC)/Forward Observer(FO) if available. If not, all leadership can request support through their chain of command. Only the highest level leader may contact the supports directly for fire if there is no JTAC/FO available.
Mortar Support Marking
Air Support Marking
For non-JTACs, mark the target on the map w/ a descriptor, and then communicate with higher elements to make a request for a strike on that target.
For JTACs, see JTAC-Aircraft Operations.
Acronym Cheat sheet
ARMA is full of Acronyms and letter soup. These list should help you see the order in the madness.
There will also be a few Prowords here. Prowords are words used in radio Procedure as a form of shorthand.
General Terms
| Acronym | Definition | Notes |
|---|---|---|
| AO | Area of Operations | The specific part of the map you are limited to |
| Chalk | A Group of soldiers grouped for air movement | Often used to organize what landing wave a group is in |
| CQB | Close Quarters Battle | Mostly pertaining to fighting inside buildings |
| CQC | Close Quarters Combat | Same as above |
| MOUT | Military Operations in Urban Terrain | School of tactics related to fighting in and around Cities |
| PID | Positive Identification | Make sure you know who or what you are looking at |
| ROE | Rules Of Engagement | How and when you are allowed to fight |
| ERA | Explosive Reactive Armor | A system used on vehicles to negate or reduce effectiveness of certain munitions |
Infantry Roles And Assets
| Acronym | Definition | Notes |
|---|---|---|
| ASL | Alpha Squad Leader | |
| AAR | Assistant Auto-Rifleman | Spotter and ammo bearer for AR |
| AR | Automatic Rifleman/Rifle | |
| BSL | Bravo Squad Leader | |
| COY | Company | |
| CSL | Charlie Squad Leader | |
| FAC | Forward Air Controller | Spots for and directs Air Assets |
| FO | Forward Observer | Spots for and directs Artillery assets |
| FT | Fireteam | 6 man element. 2 to a squad. |
| FTL | Fireteam Leader | |
| GREN | Grenadier | Carries grenade launcher or extra grenades |
| HAT | Heavy Anti-Tank | Typically Static AT launchers |
| HMG | Heavy Machinegun | Typically A .50 caliber Machinegun |
| INF | Infantry | |
| JTAC | Joint Terminal Attack Controller | Spots for and directs Air assets (NATO term for FAC) |
| LAT | Light Anti-Tank | Man portable Disposable rocket launchers |
| MMG | Medium Machinegun | Typically a belt fed .30 cal (7.62mm) Machinegun |
| MRT | Mortar Team | |
| MO | Medical Officer | Manages the PLT Field Hospital |
| PL | Platoon or Platoon lead | |
| PLT | Platoon | |
| RAT | Rifleman Anti-Tank | Carries FT's anti tank |
Radio Communications
| Acronyms & Prowords | Definition | Notes |
|---|---|---|
| ACES | Ammo, Casualties, Equipment, Situation | To be reported in order |
| BDA | Bomb Damage Assessment | Report of effectiveness of Air/Arty Strike. |
| Black | Expended resource | "A2, black on ammo" |
| CallSign | A radio codename | |
| ETA | Estimated Time of Arrival | "Reinforcements ETA 10 Mikes" |
| Green | Full on resource | "Green across the board, ready to fight" |
| Mike | Minute | |
| Net | Network | A radio channel |
| Oscar Mike | On The Move | |
| Over | Proword used to end a message while asking for a reply | |
| Out | Proword used to mark the end of a transmission | |
| Red | Critically Low on Resource | "Red on Bandages" |
| Radio Check | Please confirm my radio is working and you can hear me | |
| SITREP | Situational Report | Either giving or asking for a report |
| TIC | Troops In Contact | A short concise way to report initial contact "Pl, Alpha. TIC east out" |
| Station | Your Radio | |
| Yellow | Have used a small amount of resource | Not in immediate need of resupply |
Map Markers & Briefing
| Acronym | Definition | Notes |
|---|---|---|
| AO | Area of Operations | |
| ASR | Alternate Supply Route | The veins that branch from an MSR |
| BOF | Base Of Fire | An element meant to provide Fire Superiority |
| CP | Command Post | |
| CCP | Casualty Collection Point | |
| COP | Combat Outpost | Small fortified outpost relies on supply and patrols from FOB |
| DP | Dismount Point | For troops mounted in land vehicles to leave the vehicle |
| DZ | Drop Zone | You parachute here |
| EA | Enemy Armor | |
| EI | Enemy Infantry | |
| FH | Field Hospital | |
| FOB | Forward Operations Base | Large Fortified forward base |
| HVT | High Value Target | Valuable enemy to Kill or Capture |
| HQ | Headquarters | |
| LDA | Linear Danger Area | A corridor of death that exposes your flank. Ig: A road you need to cross |
| LOA | Limit Of Advance | The furthest extent of an assault or movement |
| LZ | Landing zone | Where you land your boats or helicopters |
| MSR | Main Supply Route | The main artery into an AO Usually a major highway or the largest road |
| PL | A Phase Line | A line typically a grid line or road that indicates the starting line of an operational Phase |
| Phase | A codenamed section of the overall plan | Not to be executed until command uses the codeword |
| RP | Rally Point / Regroup Point | A point at which units form up after being separated from one another |
| SA/SP/STAGE | Staging point | A point at which a unit forms up for to get ready to move or attack |
| TOC | Tactical Operations center | |
| TRP | Target Reference Point | A terrain or building feature that aids in navigation and or talking support onto a target |
| VIC / VEH | Vehicle | |
| VIP | Very Important Person | An ally we need to protect or rescue |
| WP | Waypoint | A navigational aid to stay on the correct path, usually near something that can be used as a reference point |
Vehicles Roles and Assets
| Acronym | Definition | Notes |
|---|---|---|
| AA | Anti Aircraft | Generic term for any Anti Aircraft platform |
| AAA / Triple A | Anti Aircraft Artillery | Cannons meant to shoot at aircraft |
| AAV / AAVP | Assault Amphibious Vehicle (Personnel) | A Seaworthy APC |
| AH | Attack Helicopter | A helicopter with CAS capability |
| APC | Armored Personal Carrier | A Lightly Armored vehicle meant to transport troops, occasionally armed with machine guns. M113 and BTRs are examples |
| ARTY | Artillery | |
| CAS | Close Air Support | |
| Fast Mover | A Jet Fighter/Bomber | |
| FW | Fixed Wing | A Plane |
| IFV | Infantry Fighting Vehicle | An Armored vehicle that can transport and support a small team. Armed with Cannons and anti tank missiles. |
| MBT | Main Battle Tank | Heavily Armored vehicle with a large caliber high velocity gun |
| MLRS | Multiple Launch Rocket System | Rocket Artillery normally vehicle mounted |
| SAM | Surface to Air Missile | A form of anti Aircraft |
| SPAA | Self Propelled Anti-Air | Sometimes A "G" is added for Gun. SPAAG |
| SPG | Self Propelled Gun | A howitzer on tracks or wheels. |
| TH | Transport Helicopter | |
| Technical | An improvised combat vehicle | Normally a pickup truck with a .50cal MG bolted to it. |
| UGV | Unmanned Ground Vehicle | |
| UAV | Unmanned Aerial Vehicle |
Munitions
| Acronym | Definition | Notes |
|---|---|---|
| AA | Anti-Air | |
| AB | Air Burst | Normally Anti-Personnel |
| AP | Armor Piercing | Anti-Personnel if used in most rocket launchers |
| APDS | Armor Piercing Discarding Sabot | A very high velocity moving sub caliber dart made of dense material |
| APFSDS | Armor Piercing Fin Stabilized Discarding Sabot | Same as above but with fins |
| ATGM | Anti-Tank Guided Missile | Anti-Tank missile that either locks on or is manually guided |
| Canister | Canister full of ball bearings or Flechettes | Anti personnel |
| Cluster | Releases a Cluster of smaller bombs | Airburst to disperse bomblets or mines |
| HEAA | High Explosive Anti-Armor | The Marines like their own terms. Its HEAT damn it. |
| HEAT | High Explosive Anti-Tank | A shaped charge meant to penetrate armor |
| HEDP | High Explosive Dual Purpose | A mix of HEAT and HEF |
| HEF | High Explosive Fragmentation | HE shell filled with or meant to cause shrapnel |
| HET | High Explosive Timed | HE shell that explodes a pre-determined time after impact, can cause airburst |
| T-HEAT / Tandem | Tandem High Explosive Anti-Tank | Round with two HEAT charges to defeat reactive armor |
| TB / Thermo | Thermobaric | A fuel air bomb. Anti-Personnel works well if it goes off inside fortifications |
| ILLUM | Illumination | Flares that turn night into day |
