Difference between revisions of "Machine Gun Team"
Views
Actions
Namespaces
Variants
Tools
| (20 intermediate revisions by 2 users not shown) | |||
| Line 13: | Line 13: | ||
* Squad Automatic Rifle System (Ig. RPK, M249) | * Squad Automatic Rifle System (Ig. RPK, M249) | ||
** Bipod if weapon supports it | ** Bipod if weapon supports it | ||
** Non magnified optic if supplied | ** Non magnified optic if supplied (Ig. EOTech or Kobra) | ||
* Sidearm | * Sidearm | ||
| Line 21: | Line 21: | ||
* Entrenchment tool | * Entrenchment tool | ||
* Binoculars | * Binoculars | ||
* Extra Ammo for the Automatic rifle. | * Extra Ammo for the Automatic rifle. | ||
== MMG/HMG Roles == | == MMG/HMG Roles == | ||
| Line 44: | Line 44: | ||
== MMG/HMG Operation == | == MMG/HMG Operation == | ||
;Once a location for the team to set up is decided upon | |||
:# The Leader will determine the desired firing arcs | |||
* The | :#* He should take into account the objective at hand. Simply defending? Ambush? Providing a base of fire for friendly maneuvers? | ||
* The Gunner will set the weapon's zero to the appropriate setting for the distance and prepare to acquire targets. | :# The Gunner and Assistant will establish a field of fire and fortifications within the specified area of operation, utilizing their best judgement of the locale to pick the exact spot to cover the desired firing arcs. | ||
:#* If you do not need wide fields of fire, consider setting up keyholes to conceal your position. | |||
* The Assistant will take up a security position to protect the nest's flanks. | :# The Leader and/or Assistant will provide range estimates of various landmarks within the arc of fire to the Gunner. | ||
:#*It is useful to fill out a range card with this data if you have time. | |||
:# The Gunner will set the weapon's zero to the appropriate setting for the distance and prepare to acquire targets. | |||
:# The Leader will select targets for the Gunner in preparation of combat. | |||
:#* Should the gunner prioritize infantry? Vehicles? Other Machine guns? Fortifications? If ambushing, what part of the enemy formation is he shooting first? | |||
:# The Assistant will take up a security position to protect the nest's flanks. | |||
* The | :# The Leader will specify a firing rate and issue the command to begin firing. | ||
:# The Gunner will begin firing at specified targets or targets of opportunity within the designated zone. | |||
:#*The Leader will issue corrections of distance and angle to improve effectiveness. | |||
= Fundamentals of Machinegun Marksmanship = | |||
= Fundamentals of | |||
Principles of handling a machinegun. Limited to what can realistically be used in Arma. | Principles of handling a machinegun. Limited to what can realistically be used in Arma. | ||
== Characteristics of fire == | == Characteristics of fire == | ||
| Line 65: | Line 65: | ||
These involve things like your bullet trajectory and the spread over range | These involve things like your bullet trajectory and the spread over range | ||
As an example of why these things matter; the default zero on most AK-74 and RPK-74 sights in game is often 440m. This is an old soviet doctrine taking advantage of the trajectory of their cartridges to make an easily trainable "battle zero". if you aim at the belt buckle while the rifle is set to this zero at any distance out to 440m, you will hit a man somewhere in the chest. This effectively eliminates the need for basic infantry to memorize holdovers for each range or having to fiddle with their elevation adjustment often. Crude, but effective. Of course they could also always zero the damned rifle and try to get those sick headshots. But you get the point! | |||
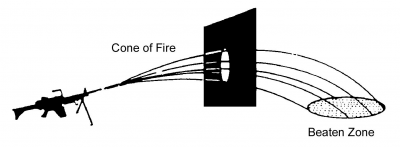
===Cone Of Fire And Beaten Zone=== | ===Cone Of Fire And Beaten Zone=== | ||
[[File:BeantenCone. | [[File:BeantenCone.PNG|400px|thumb|From the US Army Handbook]] | ||
There are two ways you need to think about the spread pattern from your weapon. | There are two ways you need to think about the spread pattern from your weapon. | ||
| Line 74: | Line 78: | ||
:It is important to take your cone of fire into account when engaging targets. You can sometimes deny an entire bunker from returning fire by relying on your cone of fire instead of shifting your point of aim. | :It is important to take your cone of fire into account when engaging targets. You can sometimes deny an entire bunker from returning fire by relying on your cone of fire instead of shifting your point of aim. | ||
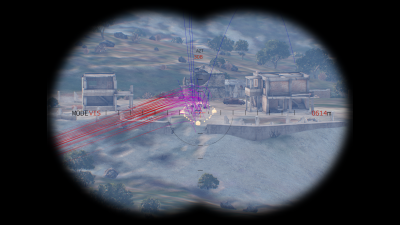
[[File:BeatenZone.png|400px|thumb|A fireteam caught in a Beaten zone from Plunging fire<br/> '''Click to ENHANCE!''']] | |||
;Beaten zone | |||
: The beaten zone is the elliptical pattern formed by the rounds striking the ground or the target. The size and shape of the beaten zone changes when the range to the target changes or when the machine gun is fired on different types of terrain. On uniformly sloping or level terrain, the beaten zone is long and narrow. As the range to the target increases, the beaten zone becomes shorter and wider. When fire is delivered on terrain sloping down and away from the machine gun, the beaten zone becomes longer. When fire is delivered on rising terrain, the beaten zone becomes shorter. The terrain has little effect on the width of the beaten zone. | : The beaten zone is the elliptical pattern formed by the rounds striking the ground or the target. The size and shape of the beaten zone changes when the range to the target changes or when the machine gun is fired on different types of terrain. On uniformly sloping or level terrain, the beaten zone is long and narrow. As the range to the target increases, the beaten zone becomes shorter and wider. When fire is delivered on terrain sloping down and away from the machine gun, the beaten zone becomes longer. When fire is delivered on rising terrain, the beaten zone becomes shorter. The terrain has little effect on the width of the beaten zone. | ||
:To make the most effective use of your beaten zone you should aim at the centerline of the target at its base. This ensures most rounds will either be direct hits or fall slightly short and potentially ricochet on target. | :To make the most effective use of your beaten zone you should aim at the centerline of the target at its base. Otherwise known as a 6 o'clock hold. This ensures most rounds will either be direct hits or fall slightly short and potentially ricochet on target. As an added bonus, your rounds are easier to spot and adjust because the splash will be in front of the target. | ||
:You can use your beaten zone to your advantage to suppress a large area without shifting your point of aim. If you are in a defensive position, you can also chart your rough beaten zone on a range card for each reference target. Knowing your beaten zone can even let you fire out of defilade onto a target you cannot see with the aid of an observer | :You can use your beaten zone to your advantage to suppress a large area without shifting your point of aim. If you are in a defensive position, you can also chart your rough beaten zone on a range card for each reference target. Knowing your beaten zone can even let you fire out of defilade onto a target you cannot see with the aid of an observer, However unlikely that is to actually happen in game! | ||
===Danger Space=== | ===Danger Space=== | ||
| Line 91: | Line 96: | ||
=== Classes of fire === | === Classes of fire === | ||
There are 3 classes of fire. Fire in relation to the ground, In relation to the target, and In relation to the gun. | There are 3 classes of fire. Fire in relation to the ground, In relation to the target, and In relation to the gun. | ||
| Line 99: | Line 104: | ||
==== Grazing and Plunging Fire==== | ==== Grazing and Plunging Fire==== | ||
---- | ---- | ||
These are fire methods in relation to the ground. | These are fire methods in relation to the ground. | ||
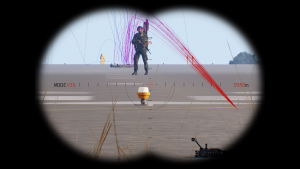
;Grazing Fire : Grazing fire occurs when the center of the cone of fire does not rise more than 1 meter above the ground. When firing on level or uniformly sloping terrain, the gunner can obtain a maximum of 600 meters of grazing fire. With grazing fire you are able to use both your cone of fire and your beaten zone. | ;Grazing Fire : Grazing fire occurs when the center of the cone of fire does not rise more than 1 meter above the ground. When firing on level or uniformly sloping terrain, the gunner can obtain a maximum of 600 meters of grazing fire. With grazing fire you are able to use both your cone of fire and your beaten zone. | ||
[[File:Grazing.png|300px|thumb|center|An example of Grazing Fire. Close target is at 350m standing in the cone of fire. Dead Target is laying in the beaten zone at 700m. <br/>'''Click to ENHANCE!''']] | |||
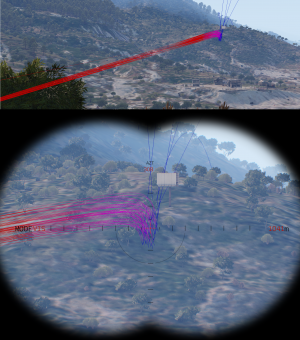
;Plunging Fire : Plunging fire occurs when the danger space is confined to the beaten zone. Plunging fire also occurs when firing at long ranges, from high ground to low ground, into abruptly rising ground, or across uneven terrain, resulting in a loss of grazing fire at any point along the trajectory. | ;Plunging Fire : Plunging fire occurs when the danger space is confined to the beaten zone. Plunging fire also occurs when firing at long ranges, from high ground to low ground, into abruptly rising ground, or across uneven terrain, resulting in a loss of grazing fire at any point along the trajectory. | ||
[[File:Graze&plunge.png|thumb|center|500px|From the US Army handbook<br/> '''Click to ENHANCE!''']] | |||
[[File:plunging.png|300px|thumb|center| An example of plunging fire. Hits rely on the target being in the beaten zone. <br/>'''Click to ENHANCE!''']] | |||
==== In Relation To the Enemy ==== | ==== In Relation To the Enemy ==== | ||
| Line 125: | Line 134: | ||
;Searching Fire : Searching fire is fire distributed in depth by successive changes in elevation. The gunner selects successive aiming points in depth. The changes made in each aiming point will depend on the range and slope of the ground. | ;Searching Fire : Searching fire is fire distributed in depth by successive changes in elevation. The gunner selects successive aiming points in depth. The changes made in each aiming point will depend on the range and slope of the ground. | ||
;Traversing and Searching Fire : Traversing and searching fire is fire distributed in width and depth by successive changes in direction and elevation. Combining traversing and searching provides good coverage of the target. Adjustments are made in the same manner as described for traversing and searching fire. | ;Traversing and Searching Fire : Traversing and searching fire is fire distributed in width and depth by successive changes in direction and elevation. Combining traversing and searching provides good coverage of the target. Adjustments are made in the same manner as described for traversing and searching fire. | ||
;Free Gun : Engaging multiple points rapidly. In Arma this is always possible even with mounted/static guns. In real life, you would need to remove the traverse and elevation device from the mount before being able to free gun. | |||
[[File:RelationToGun.png|thumb|center|500px|From the US Army handbook<br/> '''Click to ENHANCE!''']] | |||
==Application of fire== | ==Application of fire== | ||
| Line 182: | Line 194: | ||
This also gives each gun time to reload without worrying about a gap in the volume of fire. | This also gives each gun time to reload without worrying about a gap in the volume of fire. | ||
{{#ev:youtube|https://youtu.be/ThsGaj6_Cpg?t=12|1000px|center| An example of talking guns at the range|start=12}} | |||
== Weapon Sight Profiles == | == Weapon Sight Profiles == | ||
(Common MG optic guides to be added. For example the Elcan.) | (Common MG optic guides to be added. For example the Elcan.) | ||
Latest revision as of 22:27, 7 March 2022
Overview
Is exploiting the suppression mechanic your favorite activity? Do you appreciate the fine art of swiss cheesing light vehicles? Do you crave overwhelming amounts of DAKKA?! Then operating a machine gun may be your calling!
Be it a basic Auto-rifleman, or a full blown emplaced or turret mounted Heavy Machine Gun. The same basic principles apply!
Automatic Rifleman Buddy Team
- The Automatic rifleman himself is the second in command of his fireteam. He coordinates with his FTL to position himself and his assistant in an effective way for the given objective.
- The AAR - Assistant Automatic rifleman carries extra ammo, builds trenches to house the gun, clears grass and brush to open up sightlines, and uses his binoculars to guide the gunner's fire on target.
AR Buddy Team Equipment
In addition to the standard GI loadout such as radios and bandages, The AR Buddy team is outfitted with the following specialized equipment to assist them in their role:
Automatic Rifleman
- Squad Automatic Rifle System (Ig. RPK, M249)
- Bipod if weapon supports it
- Non magnified optic if supplied (Ig. EOTech or Kobra)
- Sidearm
Assistant Auto-rifleman
- Standard Rifle/Carbine
- Non magnified optic if supplied.
- Entrenchment tool
- Binoculars
- Extra Ammo for the Automatic rifle.
MMG/HMG Roles
- The Team Leader/Commander coordinates at the Squad and Platoon level to acquire movement and targeting information, which is then passed along to the rest of the team.
- The Gunner operates the primary weapon system, managing ammunition consumption and weapon function.
- The Assistant builds fortifications to house the weapon system and gunner, supplies ammunition as needed and provides area security.
MMG/HMG Equipment
In addition to the standard GI loadout such as radios and bandages, the machine gun team is outfitted with the following specialized equipment to assist them in their role:
Team Lead/Commander
- Squad and/or Platoon-level Radios
- Binoculars
Gunner
- Primary Weapon System
- Magnified optic if supplied (Ig. Elcan)
- Packed in backpack for HMG platforms
Assistant/Loader
- Primary Weapon Ammunition
- Binoculars
- Entrenchment Tool
- Weapon Bipod (If fielding a HMG platform)
MMG/HMG Operation
- Once a location for the team to set up is decided upon
-
- The Leader will determine the desired firing arcs
- He should take into account the objective at hand. Simply defending? Ambush? Providing a base of fire for friendly maneuvers?
- The Gunner and Assistant will establish a field of fire and fortifications within the specified area of operation, utilizing their best judgement of the locale to pick the exact spot to cover the desired firing arcs.
- If you do not need wide fields of fire, consider setting up keyholes to conceal your position.
- The Leader and/or Assistant will provide range estimates of various landmarks within the arc of fire to the Gunner.
- It is useful to fill out a range card with this data if you have time.
- The Gunner will set the weapon's zero to the appropriate setting for the distance and prepare to acquire targets.
- The Leader will select targets for the Gunner in preparation of combat.
- Should the gunner prioritize infantry? Vehicles? Other Machine guns? Fortifications? If ambushing, what part of the enemy formation is he shooting first?
- The Assistant will take up a security position to protect the nest's flanks.
- The Leader will specify a firing rate and issue the command to begin firing.
- The Gunner will begin firing at specified targets or targets of opportunity within the designated zone.
- The Leader will issue corrections of distance and angle to improve effectiveness.
- The Leader will determine the desired firing arcs
Fundamentals of Machinegun Marksmanship
Principles of handling a machinegun. Limited to what can realistically be used in Arma.
Characteristics of fire
You can use the characteristics of your weapon's fire to your advantage.
These involve things like your bullet trajectory and the spread over range
As an example of why these things matter; the default zero on most AK-74 and RPK-74 sights in game is often 440m. This is an old soviet doctrine taking advantage of the trajectory of their cartridges to make an easily trainable "battle zero". if you aim at the belt buckle while the rifle is set to this zero at any distance out to 440m, you will hit a man somewhere in the chest. This effectively eliminates the need for basic infantry to memorize holdovers for each range or having to fiddle with their elevation adjustment often. Crude, but effective. Of course they could also always zero the damned rifle and try to get those sick headshots. But you get the point!
Cone Of Fire And Beaten Zone
There are two ways you need to think about the spread pattern from your weapon.
- Cone of Fire
- When several rounds are fired in a burst from any machine gun, each round takes a slightly different trajectory. The pattern these rounds form on the way to the target is called a cone of fire. This pattern is caused primarily by vibration of the machine gun and variations in ammunition and atmospheric conditions. This is how your rounds will impact on a horizontal plane, say for example a barn door at 300m on level ground.
- It is important to take your cone of fire into account when engaging targets. You can sometimes deny an entire bunker from returning fire by relying on your cone of fire instead of shifting your point of aim.
- Beaten zone
- The beaten zone is the elliptical pattern formed by the rounds striking the ground or the target. The size and shape of the beaten zone changes when the range to the target changes or when the machine gun is fired on different types of terrain. On uniformly sloping or level terrain, the beaten zone is long and narrow. As the range to the target increases, the beaten zone becomes shorter and wider. When fire is delivered on terrain sloping down and away from the machine gun, the beaten zone becomes longer. When fire is delivered on rising terrain, the beaten zone becomes shorter. The terrain has little effect on the width of the beaten zone.
- To make the most effective use of your beaten zone you should aim at the centerline of the target at its base. Otherwise known as a 6 o'clock hold. This ensures most rounds will either be direct hits or fall slightly short and potentially ricochet on target. As an added bonus, your rounds are easier to spot and adjust because the splash will be in front of the target.
- You can use your beaten zone to your advantage to suppress a large area without shifting your point of aim. If you are in a defensive position, you can also chart your rough beaten zone on a range card for each reference target. Knowing your beaten zone can even let you fire out of defilade onto a target you cannot see with the aid of an observer, However unlikely that is to actually happen in game!
Danger Space
The danger space is the space between the machine gun and the target where the trajectory does not rise above 1.8 meters (the average height of a standing soldier). This space includes the area of the beaten zone. When the machine gun is fired on level or uniformly sloping terrain at a target less than 700 meters away, the trajectory does not rise above the average height of a standing soldier. When targets are engaged on level or uniformly sloping terrain at ranges greater than 700 meters, the trajectory rises above the average height of a standing soldier, therefore, not all the distance between the machine gun and the target is danger space.
They probably had to change this to "space" to avoid all the danger zone jokes huh?
Why is the Danger space important you ask? Well it sets you up to understand the next principles of fire!
Classes of fire
There are 3 classes of fire. Fire in relation to the ground, In relation to the target, and In relation to the gun.
Understanding these will help you position your gun for the desired effect.
Grazing and Plunging Fire
These are fire methods in relation to the ground.
- Grazing Fire
- Grazing fire occurs when the center of the cone of fire does not rise more than 1 meter above the ground. When firing on level or uniformly sloping terrain, the gunner can obtain a maximum of 600 meters of grazing fire. With grazing fire you are able to use both your cone of fire and your beaten zone.
- Plunging Fire
- Plunging fire occurs when the danger space is confined to the beaten zone. Plunging fire also occurs when firing at long ranges, from high ground to low ground, into abruptly rising ground, or across uneven terrain, resulting in a loss of grazing fire at any point along the trajectory.
In Relation To the Enemy
- Frontal Fire
- The beaten zone is at a right angle to the target. You are firing directly into their front.
- Flanking Fire
- You are firing at the side of the enemy.
- Oblique Fire
- Is when the long axis of the beaten zone is at an angle other than a right angle to the front of the target
- Enfilade Fire
- Is when the long axis of the beaten zone coincides or nearly coincides with the long axis of the target. This type of fire is either frontal or flanking. It is the most desirable type of fire with respect to a target, because it makes maximum use of the beaten zone. And typically gives you the most time on target.
- Enfilade Fire is why an "L-shaped" ambush is so effective. If executed properly the enemy receives both frontal and flanking enfilade fire.
In Relation To the Gun
- Fixed Fire
- Fixed fire is fire delivered against a point target when the depth and width of the beaten zone covers the target. Fixed fire also means only one aiming point is necessary to provide coverage of the target.
- Traversing Fire
- Traversing fire is fire distributed in width by successive changes in direction. The gunner selects successive aiming points throughout the width of the target. These aiming points must be close enough to ensure adequate coverage but not so close as to waste ammunition.
- Searching Fire
- Searching fire is fire distributed in depth by successive changes in elevation. The gunner selects successive aiming points in depth. The changes made in each aiming point will depend on the range and slope of the ground.
- Traversing and Searching Fire
- Traversing and searching fire is fire distributed in width and depth by successive changes in direction and elevation. Combining traversing and searching provides good coverage of the target. Adjustments are made in the same manner as described for traversing and searching fire.
- Free Gun
- Engaging multiple points rapidly. In Arma this is always possible even with mounted/static guns. In real life, you would need to remove the traverse and elevation device from the mount before being able to free gun.
Application of fire
Believe it or not, there's more to machinegunning than holding down mouse 1.
How you apply your fire can have drastic results on the enemy! You as a gunner along with your teamleader should keep these principles in mind when setting up your lanes of fire!
Types of Targets
A machinegun will typically be firing at formations of enemy troops. Troop formations can be broken down into the different types of targets they present to the shooter. This allows you to select the right class of fire to apply.
- Point Targets
- Point targets require the use of a single aiming point. Examples of point targets are individual enemy soldiers, bunkers, weapons emplacements, and lightly armored vehicles. Fixed fire is delivered at point targets
- Area Targets
- Area targets may have considerable width and depth and may require extensive traversing and searching fire. These include targets in which the exact location of the enemy is unknown.
- "Linear" area targets require traversing fire. For example, an enemy squad moving toward the machinegun in a rifle line formation.
- "Deep" area targets require searching fire. An enemy column advancing toward the machinegun for example.
Distribution and Concentration
These principles should be combined with a rate of fire for best effect.
- Distributed fire
- Is delivered in width and depth, such as when engaging fortifications or other large stationary targets. Use this much like setting the spread for an artillery strike. Give your gunner fields of fire based on references. "Start at the north most side of the hescos, and walk your fire back and forth between there and the bunker to the south"
- This is very useful to allow a friendlies to bound while the Machine-gunner keeps the enemy's heads down in a wide area.
- Concentrated fire
- Is delivered as point fire. Use this to engage specific threats such as an enemy machinegun or a specific bunker. "Engage the bunker at bearing 246, sustained fire until I call cease"
Rates of fire
It is important to balance your rate of fire to ensure you do not burn through your ammo or overheat your gun too quickly while still keeping the enemy's heads down.
Your team leader should be giving you an idea of what type of fire he wants you laying down.
Sustained Fire
This should be your default rate of fire for any machine gun. and works out to around 85-100 rounds per minute.
Sustained fire is achieved by firing in short controlled burst of 3-5 rounds, then waiting 3-5 seconds before firing another burst. This method will prevent overheating, and conserve ammo.
Slower firing weapon systems such as the M2 or m240 can aim for 6-8 round burst to achieve roughly the same 85-100 rounds per minute.
Rapid Fire
Rapid fire bumps the average rounds per minute up to around 200 by firing longer burst of 8-12 rounds and pausing for 2-3 seconds between burst.
This raises the volume of fire significantly. You may easily overheat your weapon if you attempt to use rapid fire for too long.
Cyclic Fire
Like all things in nature, a machinegunner does indeed have a distress call.
Cyclic fire is simply letting the weapon run in its full glory. You will eat belts and overheat the gun to the point you have to worry about it cooking off. Emergency use only.
Mutual Support AKA Talking Guns
When two Machineguns can see the same target, you can ensure there will always be fire on the target by "talking" the guns. This simply means if one gun is not shooting the other picks up fire.
For example. If the goal is to keep a bunker suppressed, Gun 1 will fire a 3-5 round burst, and pause for 3-5 seconds. Gun 2 will fire during Gun 1's pause. Thus it sounds like the guns are "talking"
This also gives each gun time to reload without worrying about a gap in the volume of fire.
Weapon Sight Profiles
(Common MG optic guides to be added. For example the Elcan.)
