Reforger Mission Making
Views
Actions
Namespaces
Variants
Tools
[WORK IN PROGRESS]
The purpose of this page is to show how to develop a mission in ArmA Reforger.
It will include:
- How to set up a symlink for the addons.
- How to setup GitHub Desktop and clone the Coalition Reforger Framework repository.
- How to open a world file.
- How to create a sub-scene which will allow for editing.
- How to place AIWorld and Lobby_CRF_Mode.
- How to create layers.
- How to place units and vehicles.
And more! By the end of this page, you should be able to fully create a mission in the Arma Reforger Tools and, through pull requests, have it played at CFC!
To see how the other tools in the Workbench work, check the biki (BI Wiki) here.
If you ever need any help, you can ask in the #development channel in the discord, linked here.
Prerequisites:
- Download git here: https://git-scm.com/downloads
- follow this guide first: https://docs.github.com/en/get-started/getting-started-with-git/setting-your-username-in-git
- then follow this guide: https://docs.github.com/en/account-and-profile/setting-up-and-managing-your-personal-account-on-github/managing-email-preferences/setting-your-commit-email-address
This is so you can use command prompt in github desktop as seen later in this guide.
Arma Reforger Tools: https://store.steampowered.com/app/1874910/Arma_Reforger_Tools/
You can also find it in your library by searching for it. (see below)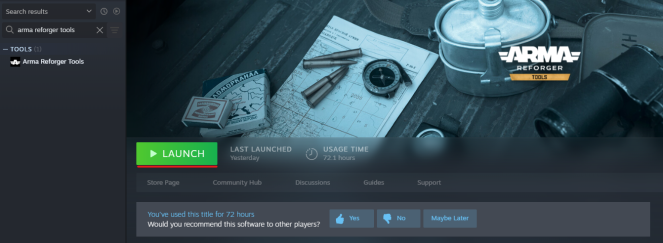
How to setup the ArmA Reforger Tools folder:
Step 1:
Open ArmA Reforger (the game, not the tools) and download the server mods.
Step 2:
Open "Command Prompt" (in administrator).
Step 3:
type:
mklink /D "USERNAME\Documents\My Games\ArmaReforgerWorkbench\addons\" "USERNAME\Documents\My Games\ArmaReforger\addons"
pause
IMPORTANT! do not have an "addons" folder in your workbench folder else this will not work.
Step 4:
If it doesn't error out, check it has completed by going back to "Documents\My Games\ArmaReforgerWorkbench\", you can tell if it has done it correctly as it will look like the following images.
Step 5:
In the "Documents\My Games\ArmaReforgerWorkbench\" folder, create a folder called "Projects".
This section is now complete, and you are ready to begin making missions!
How to download and setup GitHub Desktop and the CRF and create a branch:
Step 1:
Go to https://desktop.github.com/ and download GitHub Desktop, follow the instructions when installing and, when it is finished, open it.
Step 2:
When you have GitHub Desktop open, click on "file" (top right), then "Clone Repository". Then in the popup box that appears, click URL, copy and paste the following link:
https://github.com/CoalitionArma/Coalition-Reforger-Framework
Into the URL bar and ensure the local path is the "Documents\My Games\ArmaReforgerWorkbench\Projects\" path you set up earlier.
When complete, it should look like this:
Step 3:
When thats done, you should have a screen like this: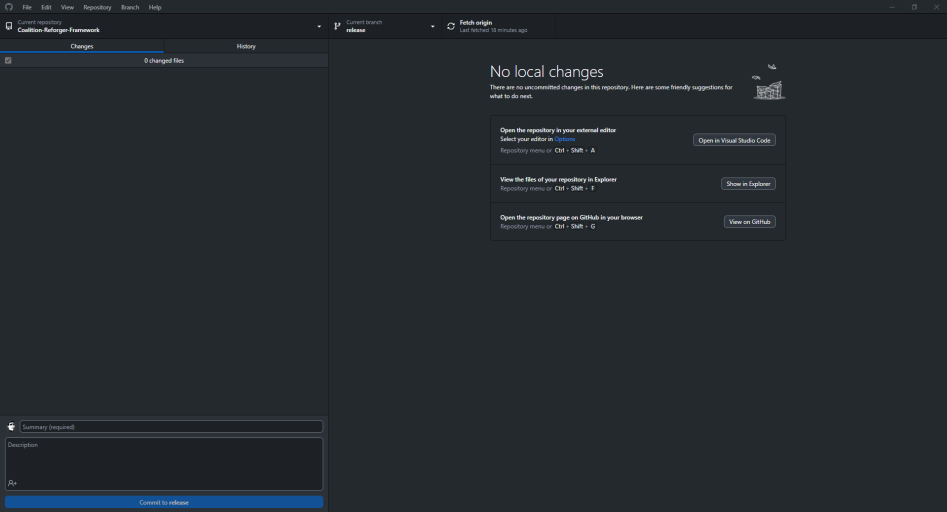
IMPORTANT! Ensure the selected branch is "release".
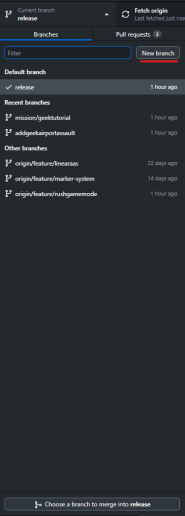
Click on "current branch", then "New Branch", then name the branch "mission/<missionname>". Then you should be redirected to a screen where the following is displayed: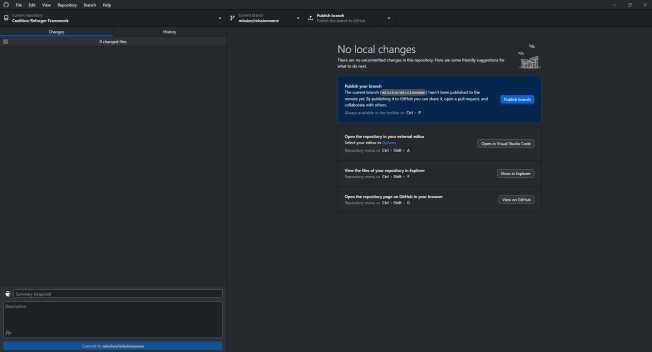
This is where we are done with GitHub Desktop for now. However, if there is ever a commit to the release branch (check here or in the development channel in the discord), go to your branch and click on the Repository button (top right, near file), click open in command prompt and type:
git pull origin release
This will update your branch to the most up-to-date version of the CRF.
Opening the Tools, the CRF and laying out the foundation for mission making:
Step 1: Open Steam, go to search and type in "arma reforger tools". Then click on the tools and open them.
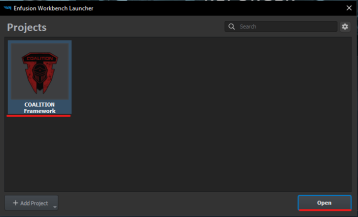
Step 2: You will see the "Enfusion Workbench Launcher" window, you can either click on the project called "COALITION Framework" and then click open, or double click on the project, both methods will open the project in the workbench proper.
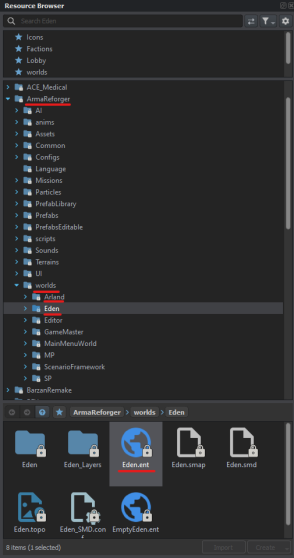
Step 3: Ignoring the majority of what is displayed, go to the "Resource Browser" on the right, click on the "ArmaReforger" folder (either by clicking directly on it or on the arrow to it's left), then click on the "worlds" folder.
Step 3a: For Everon, click on the "Eden" folder, then "Eden.ent" file in the bottom box (the first file with the globe, "EmptyEden.ent" is just an empty version of Everon and not worth using.)
Step 3b: For Arland, click on the "Arland" folder, then on "Arland.ent" file in the bottom box.
Step 3c: For other world files, either click through their respective folders until you find their .ent file or search for the file by typing the map name with no spaces and .ent at the end in the search box at the top. (For example: "WorthyIslands.ent")
Step 4:
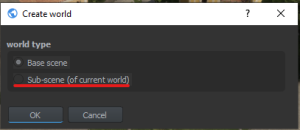
After it has loaded up, click the page icon in the top right labeled "Create New World", it should open a box with 2 options, "Base Scene" and "Sub-Scene (of current world)". Click "Sub-Scene" and that will load again as it creates the sub-scene.
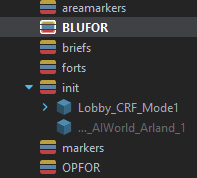
Step 5: After creating the sub scene, right click on the "default" layer (in the hierarchy, it has a yellow, blue and red icon) and click rename, rename it to "init" and press OK.
Step 6:
in the Resource Browser at the bottom, scroll to the "COALITIONFramework" folder, expand it (click the blue arrow), then expand "Prefabs", expand "MP", expand "Modes" and click Lobby to open it in the right panel of the Resource Browser. Click and hold on the file called "Lobby_CRF_Mode.et" and drag it into the game frame in the centre.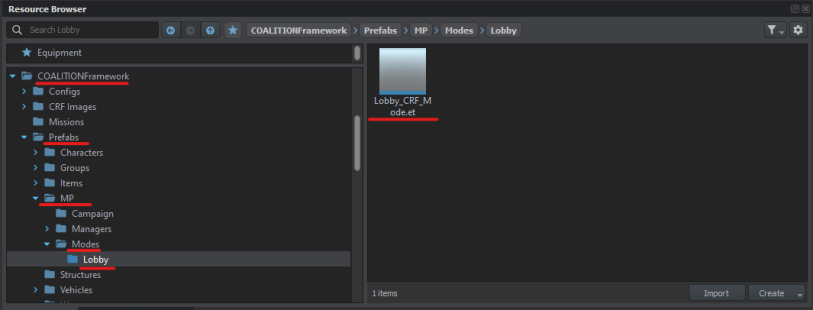
Step 7:
Go to the search bar at the top and type in "AIWorld", click on the "ArmaReforger" folder and it will open on the right panel, drag in the AIWorld for the map you are using. Eden/Everon and Arland have their own AIWorlds provided by BI. Barzan has it's own in the "BarzanRemake" folder. If it does not have it's own AIWorld in it's own folder, use the default AIWorld (no world name at the end) as this is a basic prefab and will be fine for the mission you are making.
Step 8: Save your mission as the mission name you have defined in your branch in GitHub Desktop. (for example if your github desktop branch name is "Mission1", then name the world file "Mission1".)
Step 9:
Right click on the hierarchy entry named after the mission and click "Create Layer".
Add layers for:
- BLUFOR (including vehicles and safe start markers)
- OPFOR (including vehicles and safe start markers)
- areamarkers or something named similarly (these are for the gamezonemarkers around the play area)
- markers
- briefings
- objectives
Save your changes and then follow the next steps.
Next Steps:
Congratulations! You have the basics of making a mission down.
The following guides will walk you through each mission type:
The link will take you to the final part of the guide, explaining how to create a pull request and have your mission QA'd before being added to the CRF!
