Communication and Marking
Views
Actions
Namespaces
Variants
Tools
Communication is top priority whether you're a rifleman or a platoon leader. Remember, during a session, if you're not shooting or moving, you should be communicating.
Radio Communication
Through our radio system (ACRE2), we use a full-duplex system which allows multiple people with different radios to talk on the same channel at the same time. This means we have to practice certain protocols to ensure information flows up and down the chain of command properly. By default the Caps Lock key allows you to transmit over the radio. Below is an image of the message that will appear in the bottom right of your screen when you are transmitting over the radio.
In addition to letting you know that you are transmitting this message also display some useful information. It shows which radio you are broadcasting on (in this case the PRC-343) and which channel you are broadcasting on (in this case Block 1 - Channel 1). This is important to note so you are transmitting on the correct channel using the correct radio. Before the mission starts it is worth checking your gear to see which radios you have. If you have to change the channel you are broadcasting on, you can open and close the currently selected radio by using the hotkey Ctrl + Alt + Caps Lock. If you need to cycle between multiple radio, use the hotkey Ctrl + Shift + Caps Lock. A full list of hotkeys can be found in the mission briefing.
Radio Channels/Nets
All radio nets are listed at the map briefing screen. However, you can also find a list of them here. All fireteams have their own private PRC-343 ("walkie-talkie") while communication between assets, squads, and the platoon all happen on different long-range radios such as the PRC-152, PRC-148, and the PRC-117F.
Short-Range PRC-343:
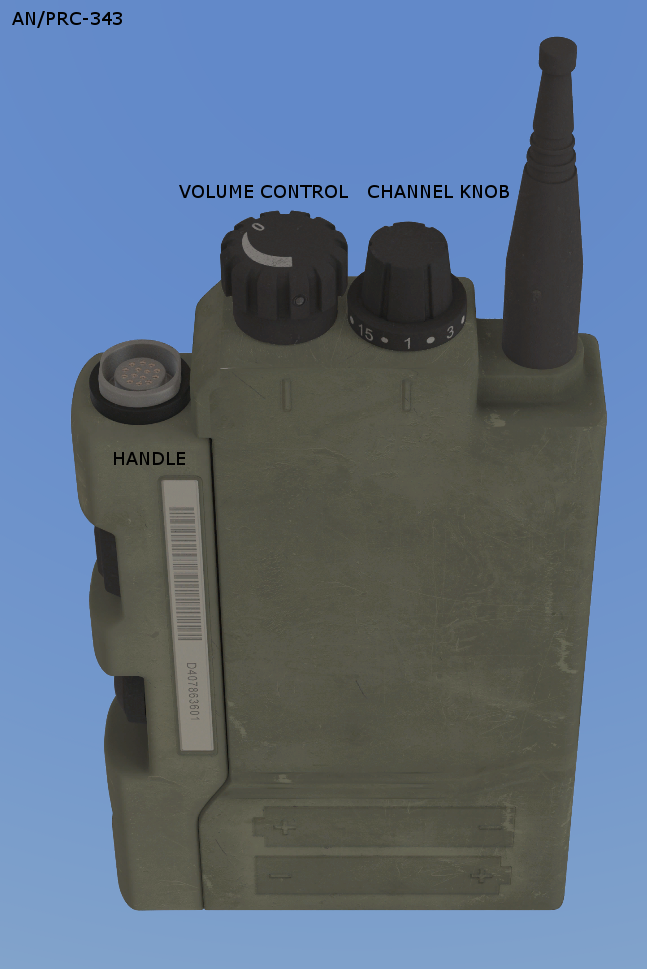
The PRC-343 or 343 is most basic radio we use. It is mostly used to communicate between fire team members. Almost every position uses a 343 to communicate and it is an important radio to become familiar with. The 343 has the shortest range of all the radios we use so it is important to remember it can only be used to contact nearby elements. It is also important to know how to change channels on the 343. Below is an image of the 343 when you open it up.
Looking at the 343, you can see there are two dials at the top as well as a detachable handle on the left side. The left dial can be used to change the volume of your radio. The right dial can be used to change the channel of your radio. The radio will go from channel 1 to channel 16. The handle on the right can also be detached to in order to change the block being transmitted on. Currently there is not need to change the block. Make sure the handle is attached or the radio will not work.
Short-Range PRC-343 Channels:
CH1 - Alpha 1
CH2 - Alpha 2
CH3 - Alpha 3
CH4 - Bravo 1
CH5 - Bravo 2
CH6 - Bravo 3
CH7 - Charlie 1
CH8 - Charlie 2
CH9 - Charlie 3
CH10 - Inter-Armor
CH11 - Inter-Air
CH12 - Inter-Platoon
Long-Range PRC-152/148/117F Channels:
CH1 - Alpha Net
CH2 - Bravo Net
CH3 - Charlie Net
CH4 - Platoon Net
CH5 - Air Net
CH6 - Armor Net
CH7 - Emergency Net
Radio Brevity
Brevity is the ability to transmit your message with utmost accuracy as quickly as possible. An example:
Scenario: You are Alpha 1 Fireteam Leader and you see enemies in front of your team, but they're not aware of your presence.
Rather than a message such as:
Alpha Squad Lead, this is Alpha 1, we uh, see about a squad size or even maybe two squads of infantry in the open over here and we need to know if we should shoot them or wait. So far, I don't think they uh, have noticed us and we're prone on the hill here.
A proper message with brevity would be:
ASL, this is A1, we have an EI squad soft contact 300 meters from us at the treeline north. Check map for "EI" mark.
Default Hotkeys
By default, your hotkeys are set to the following:
CapsLock - Default voice over network key
SHIFT + CapsLock - Alternative Radio 1 VON
CTRL + CapsLock - Alternative Radio 2 VON
ALT + CapsLock - Alternative Radio 3 VON
CTRL + DOWN - Previous Channel (active radio)
CTRL + UP - Next Channel (active radio)
CTRL + SHIFT + LEFT - Active Radio Left Ear
CTRL + SHIFT + UP - Active Radio Both Ears
CTRL + SHIFT + RIGHT - Active Radio Right Ear
CTRL + SHIFT + DOWN - Toggle headset (takes them off your ears)
TAB + Scroll UP/DOWN - Volume control
ALT + SHIFT + CapsLock - Switch radio
CTRL + ALT + CapsLock - Open radio
Direct Communication
Direct communication is any communication done between two or more players in real time. Direct communication is a skill that must be developed in order to relay information between fireteam members more efficiently and ultimately increase surviveability.
Contact Calls
A contact is anything unknown that you're able to visually or audibly identify as being present. A contact is not specifically an enemy vehicle or infantry, so make sure you always identify prior in order to avoid friendly fire incidents. Examples of contact calls:
I got audio on something tracked to the north in the treeline. Unknown distance
Contact, infantry moving in the trees to the southwest, 300 meters.
Marking
Marking is any visual form of identification across one or more mediums. This includes marks on the global map, spray painting doors after buildings have been cleared, or even lasing targets with a laser designator.
Map Types
There are two map types: Textured and Un-textured. The map type can be toggled at the top right of the map screen. It is recommended that you use un-textured for clarity of terrain and markings.
Textured
Un-Textured
Map Marking
There are two kinds of map marking: Icons and Drawn Lines. Every mark on the map must be color-coded based on who the mark is for. There are also specific techniques that platoon and squad leaders must use when developing plans.
Marking Color Code
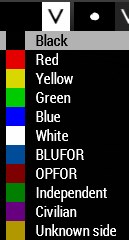
When marking the map, it is important to use the correct color to indicate which element the mark being added is addressed to. This means that all red marks are for alpha squad and so on for each element. Below is a list of the color code used for each element.
Alpha - Red
Bravo - Blue
Charlie - Green
Individual Specialties (MMG, MTR, MAT) - Purple
Command - Yellow
Armor - Orange
Everyone - Black
Prior to mission start, you can set your marker color at the top right of the map screen. This should be done by everyone while safe start is on. Below is a image of the drop down to select your marker color.
Icons
Icons are used for specific points such as dismounting, convoy start points, or even mortar/air strike requests. Icon example:
Drawn Lines
Lines are used to draw movement plans, areas of operation, or even specific blocking orders. Lines can be drawn by holding down the left control key and left mouse button. Line example:
EI Map Marks
EI: Enemy Infantry
Every "EI call" must be marked on the map once they are pointed out. This allows for direct identification on all levels of command based on color-coded marks. As an example, if it's a green "ei" mark, then charlie has obviously spotted and called out enemy infantry. Alternatively, if it was blue, bravo has spotted them.
In this example, Alpha has marked spotted EI at the top of this hill:
In general, we also name terrain within the area of operation. As this hill's overall peak is 100 meters above sea-level, we'd often refer to this as hill 100 and mark it as such.
Command Map Planning
Regardless of who is in command at the time of mission start, all mission commanders need to follow the same type of planning system. This ensures that all players have a streamlined and structured experience without the need to adapt to different leadership styles as a whole. Failure to do so will result in commanding rights being revoked. The following are examples of full plans.
Convoy
Also note that ALL convoy planned-missions must have a Mount Order defined prior to mission start. A stand MO looks like this:
Infantry
Full Plans
Convoy with Infantry Dismount/Assault
Calls for Fire
Calls for fire will always be directed by a Joint Terminal Attack Controller(JTAC)/Forward Observer(FO) if available. If not, all leadership can request support through their chain of command. Only the highest level leader may contact the supports directly for fire if there is no JTAC/FO available.
Mortar Support Marking
Air Support Marking
All airstrike requests MUST have an IP (Initial Point) and a "strike" mark as an "X". If there is multiple air defense threats, the requester can also mark an egress point for safety, but it is not required. All related-points must have the same identifier. In this screenshot, the identifier is "ROMEO". This means IP Romeo, AS Romeo, and EP Romeo would all be the same strike package.


