Spawning AI with triggers
Views
Actions
Namespaces
Variants
Tools
There is a little-documented but easy method to spawn AI in complex arrangements without scripting a bunch of stuff.
If you use this method, be sure to note how it gets activated in the notes accompanying your missions submission so QA can test it.
Here is an example vanilla-Arma mission on Jester's Google Drive: https://drive.google.com/open?id=1mn49T-tMc3TO4rG5V-fD-S32tCghy8I8
This works great for loading objective areas only as they're needed for performance reasons, or for spawning specific ambushes, or any number of things that are normally only easily done with a Zeus.
In the editor, you'll see all the AI placed as well as two triggers. The first trigger looks at all the AI in its area, saves their locations and waypoints, and immediately deletes them. The second trigger loads what was saved in the first when the player walks onto the bridge. Load the mission in MP and you'll see that when you walk onto the bridge a few AI spawn in front of you with cycling waypoints. It must be loaded in MP because the triggers will only run on the server.
Note: for cycling waypoints to work, you must place the "Cycle" waypoint such that a line is automatically drawn between it and the first "Move" waypoint. This is because the function does not save which waypoint is currently active, and if the final "Cycle" is not connected to the first "Move," the AI will only go through the list once and then stop. If this doesn't make sense, look at the example mission and note how the waypoints are placed. NOTE: waypoints do NOT have to be in the trigger area, only the group to which they are assigned does.
There are three steps to making this work in your mission:
- 1) add the trigger that saves and deletes the scene
- 2) add the trigger that loads the scene
- 3) edit the description.ext file of you mission to configure the necessary functions
Here's what you need to place in each trigger:
In the trigger that saves and deletes the scene you want to load later:
- Variable Name: whatever you want, e.g. "saveScene"
- Type: none
- Activation: none
- Repeatable: unchecked
- Server Only: checked
- Condition: true
- On Activation:
[thisTrigger, "Scene"] call mytag_fnc_savescene;
["Scene", false] call mytag_fnc_deletescene;
- On Deactivation: leave blank
In the trigger that waits for a condition to be met and then loads the scene:
You can set it up however you want depending on how you want to activate the trigger. Here's how to do it so that when a Blufor unit enters the area, the scene loads:
- Variable Name: whatever you want, e.g. "loadScene"
- Type: None
- Activation: Blufor
- Activation Type: Present
- Repeatable: unchecked
- Server Only: checked
- Condition:
this;
- On Activation:
["Scene", false] call mytag_fnc_loadscene;
["Scene2", false] call mytag_fnc_loadscene;
- On Deactivation: leave blank
You can call as many scenes as you want with one activation trigger, and it will load them all. If you want to add more scenes to be loaded once the activation trigger's condition is met, then you must simply add a a semicolon and then another line, as shown above. The example shows two scenes being loaded back in by a single trigger, but there is no hard limit.
In the description.ext:
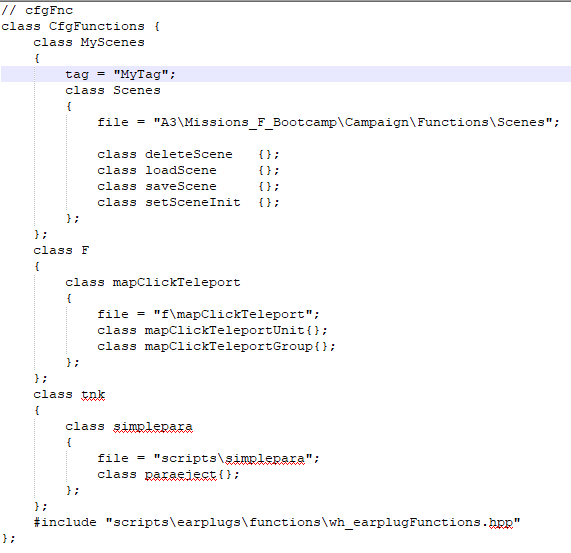
You need to add another class under the section beginning with "cfgFunctions":
	class MyScenes
	{
		tag = "MyTag";
		class Scenes
		{
			file = "A3\Missions_F_Bootcamp\Campaign\Functions\Scenes";

			class deleteScene	{};
			class loadScene		{};
			class saveScene		{};
			class setSceneInit	{};
		};
	};
It should look like this:
