Formations
Views
Actions
Namespaces
Variants
Tools
Basic Formation Information
All formations have 5 meter spacing between players unless otherwise specified by your leadership.
FTL = Fireteam Leader
AR = Automatic Rifleman
AAR = Assistant Automatic Rifleman
AT = Rifleman (Anti-Tank)
GRN = Grenadier
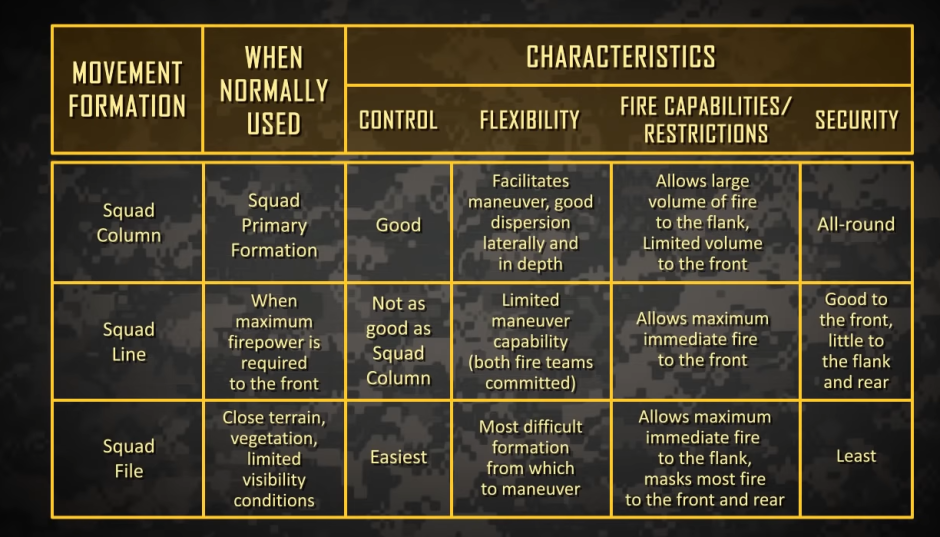
When choosing a formation for movement within your fireteam, you must consider control, flexibility, fire capability, and security.
Basic Fireteam Formations
Fireteam Wedge
          FTL
      AR      GRN
  AAR             AT
The fireteam wedge is the default formation used when moving towards contact or an unknown area. It allows for quick transitioning into a line and ease of movement. The AR should always be placed on the side of which contact is more likely to happen, so he and his team can establish a base of fire and achieve fire superiority as soon as possible.
Fireteam Column
     AT
     AR
     AAR
     FTL
     GRN
The fireteam column is best used when you expect enemy contact to come from your sides. Its frontal and rear firepower is minimal and is best used when crossing expected minefields.
Fireteam Line
  AT
         AR
  AAR
         FTL
  GRN
The fireteam line is what formation you will always turn into when reacting to contact. Regardless of what formation you where traveling in, always form a line facing the direction of first contact to maximize fire power.
Staggered Column
AT
AR
AAR
FTL
GRN
The staggered column is a good compromise for a fireteam. Naturally this will be chosen for road marches or when escorting assets. It is a very balanced formation with equal firepower to all sides. A staggered column should be preferred over a column in most situations.
Basic Squad Formations
Squad formations are chosen by the squad leader, usually team leaders have the freedom to choose the fireteam formation. However, the fireteam formation needs to be within the intent of the squad leader's choice of the squad formation. Bad examples: A squad line with fireteams in columns or a squad column with fireteams in lines. The fireteam formations are interfering and contradicting with the squad formation becoming essentially pointless.
Squad Column
Squad Column with fireteam wedges => "fireteams in the squad are aligned in a column and the fireteam formations are wedges"
          FTL
      AR      GRN
  AAR             AT

         SL
         M

           FTL
       GRN      AR
   AT             AAR
If traveling or traveling-overwatch is the movement technique to be used for the squad, this will be your default formations. It is a compromise of risk minimization due to small exposure, flexibility to transition into other formation, to react to contact, ease of control and traveling speed.
Squad Line
Squad Line with fireteam wedges => "fireteams in the squad are aligned in a line and the fireteam formations are wedges"
          FTL                       FTL
      AR      GRN               GRN      AR
  AAR             AT        AT             AAR
                       SL
                       M
The squad line is what all formations become if the entire squad comes under fire. Squad leaders should minimize time in the squad line unless defensive. If defensive, the squad line offers maximum firepower forward but leave the flank firepower to be desired.
Squad File
     AT
     AR
     AAR
     FTL
     GRN

     AT
     AR
     AAR
     FTL
     GRN

     SL
     M
The squad column lacks security to the front and rear, but maximizes firepower to the flanks. The squad column should primarily be used when contact should be avoided at all costs and when the reaction to contact will be to break from it. In most other traveling situations for large groups the formation should be a staggered column or a squad column.
US Army Video
Here is a basic instructional video used by the US Army in earlier conflicts to help explain squad and fireteam movement formations. Their TTPs still apply even in-game.
Specialized Formations
Platoon Jungle Formation
The Platoon Jungle Formation is a specialized movement formation for a platoon sized element. This formation is characterized by the squad columns that mutually support and provide security. The forward-most element can be flexible, as long as it is able to provide fire support forward.
           TL              TL
         AR  GREN      GREN  AR
      AAR        AT  AT        AAR

     TL            SL             TL
     AR            M              AR
     AAR                          AAR
     GRN                          GRN
     AT                           AT

     SL            PL             SL
     M             MO             M
               RTO/JTAC/FO
     AT                           AT
     AR                           AR
     AAR                          AAR
     GRN                          GRN
     TL                           TL
The jungle formation is vulnerable to indirect fire, but centralizes control and provides good security. In the event of contact, the formation is extremely flexible - the squad columns will swing out into lines for maximum fire support towards the contact. The Team Leaders at the rear control the swing out.
Note the position of the platoon leader and the adjacent squad leaders during movement. This proximity allows the formation to expand when it halts in order to form a perimeter. This depicts a 39 man platoon, but this can be effectively used with more or less numbers.
